
Bring Mickey's cheerful smile into your home with this Crochet Mickey Mouse Amigurumi Free Pattern and make a little doll for Disney fans.
There's something truly heartwarming about creating a little piece of joy with just yarn and a hook. Bringing to life a beloved character that has delighted generations-Mickey Mouse-in a form that you can hold, gift, or display. Thanks to the wonderful tutorial and design provided by Bibi Crochet on YouTube, many can now easily make their own version with the "Crochet Mickey Mouse Amigurumi Pattern." This project is not just any toy; it's an adorable amigurumi doll that perfectly captures the charm of the iconic Disney character. Whether you're looking to create a thoughtful gift for a child, a whimsical keychain to brighten your day, or a unique decorative piece for your living space, this Mickey Mouse amigurumi offers endless possibilities.
Iconic Crochet Mickey Mouse Amigurumi Free Pattern for Disney Fans
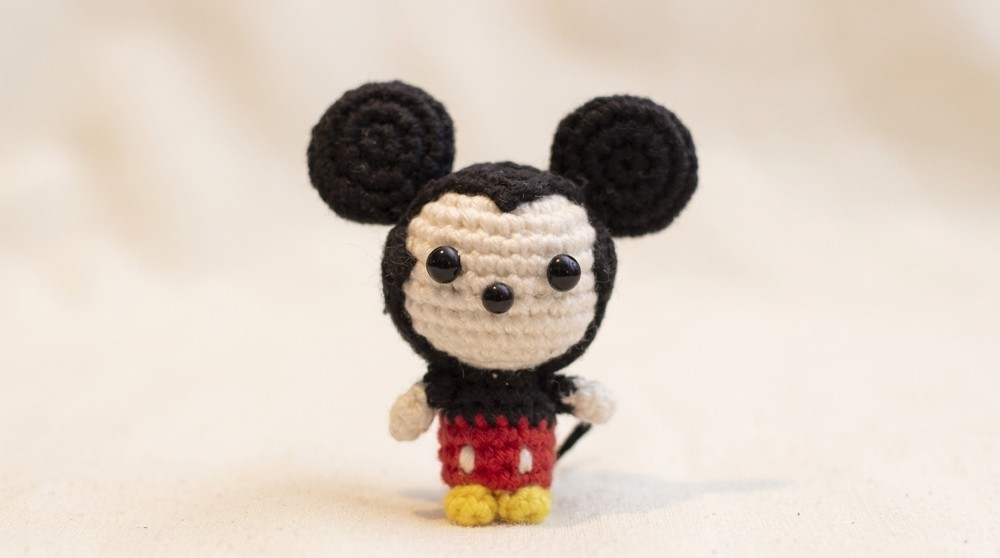
The beauty of this Mickey Mouse lies in its playful yet detailed design. It showcases a rounded, soft texture that invites touch, with a classic shape that instantly recalls Mickey's unmistakable silhouette-large circular ears, cute yellow shoes, a red body with black accents, and the friendly expression that makes Mickey so endearing. Its compact size makes it perfect for adorning desks, shelves, or even as a cuddly companion for little ones. The standout features include the cleverly stitched eyes and nose, which can be made from yarn for safety or felt for a smoother finish. The carefully shaped limbs and tail add a polished, lifelike appeal that makes this amigurumi a joy to both create and admire.
With its soft texture, bright colors, and familiar style, this amigurumi appeals to Disney fans of all ages. It is a wonderful way to celebrate childhood memories or add a charming accent to any room. Whether as a gift or a personal keepsake, this Mickey Mouse amigurumi brings warmth and happiness wherever it goes.
Playtime Crochet Mickey Mouse Amigurumi Free Pattern
This guide presents an amigurumi pattern inspired by Mickey Mouse, structured for clarity and ease of use. By following a precise sequence of rounds, color changes, and assembly instructions, you will progress through the preparation of each key component-head, face, body, limbs, and finishing details. Every stage ensures neat construction and symmetry, so the finished piece maintains its characteristic silhouette and charm. Ample guidance is given throughout to sustain steady progress, supporting both the preparation of individual parts and their final assembly. The use of standard stitches and accessible materials makes this project achievable with modest crochet experience.
Quick Overview Of Pattern
- Head, body, and limbs are worked in the round with basic increases and decreases.
- Color changes and piece-shaping occur at specific intervals for optimal character formation.
- Facial features and ears are created separately and sewn for dimension and accuracy.
- Final details, including embroidered eyes, nose, and tail, complete the overall appearance.
Notes
- Consistent stitch tension is crucial, especially as pieces are stuffed and assembled.
- Stitch markers will help you identify round beginnings and endings.
- Use invisible decreases for a clean look, particularly in final rounds and closing.
- Each round begins with a chain and continues in a spiral unless otherwise specified.
- Proceed step-by-step, taking care to refer to the stitch count after each round.
- Color changes are performed by working the final pull-through of the last stitch in the new yarn color.
Skill Level
- Advanced Beginner to Intermediate:
- The pattern uses basic amigurumi techniques including magic ring, increases, decreases, and color changes. Some sewing and embroidery finish the project.
Materials
- Yarn: 3.5 weight (yellow, red, white, and black)
- Stuffing: Cotton/polyester fiberfill
- Crochet Hook: 2 mm
- Scissors
- Yarn Needle
- Glue: for the tail
- Optional: Keyring attachments
Measurements / Sizing
- Finished size: Approximately 7-10 cm high (depends on yarn, tension, and stuffing amount)
- Width: Roughly 4-6 cm at widest point (head or body)
Gauge
- Gauge is not critical for amigurumi, but tight stitches are needed so stuffing does not show.
- 6 single crochet stitches ≈ 2 cm in the round.
Stitch Abbreviations
- MR - Magic ring
- sc - Single crochet
- inc - Increase (2 sc in same stitch)
- dec - Decrease (single crochet 2 together)
- ch - Chain
- hdc - Half-double crochet
- sl st - Slip stitch
Special Stitches
- Magic Ring (MR): Wrap yarn to form a ring, crochet required stitches into ring, pull tight.
- Invisible Decrease: Insert hook into front loops only of next two stitches, yarn over, pull through, yarn over, pull through remaining loops.
The Crochet Pattern
Head (Black Yarn)
- Round 1: Magic ring, 7 sc into MR. Close ring, place stitch marker.
- Round 2: 2 sc in each stitch (increase) - 14 sc.
- Round 3: Repeat 1 sc, 1 inc - 21 sc.

- Round 4: Repeat 2 sc, 1 inc - 28 sc.
- Rounds 5-10: 1 sc in each stitch for 6 rounds - 28 sc per round.

- Round 11: Repeat 2 sc, 1 dec - 21 sc.
- Round 12: Repeat 1 sc, 1 dec - 14 sc.
- Round 13: All decreases around - 7 sc (stuff before closing).

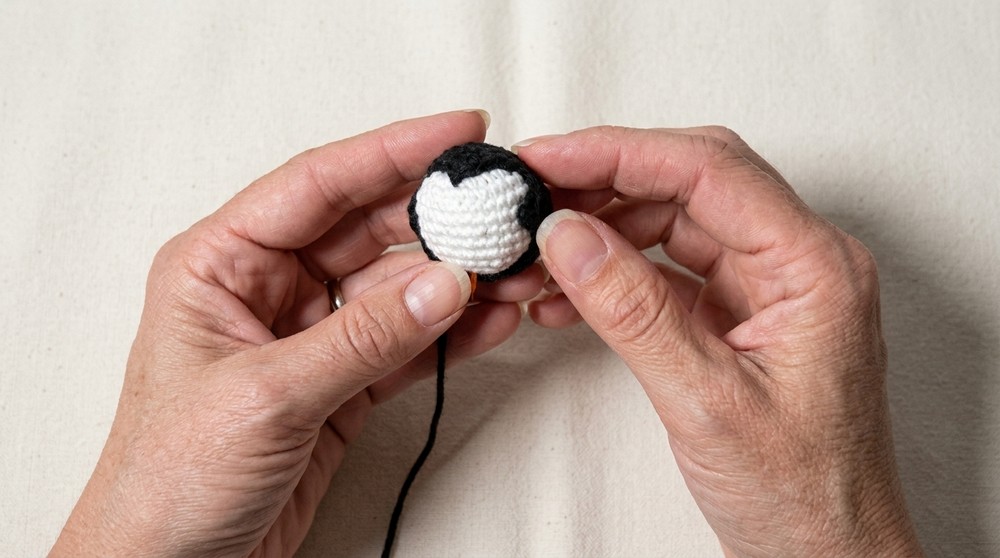
Face Detail (Black Part)
- Rounds 1-4: Repeat Head rounds 1-4 with black yarn.
- Rounds 5-9: 28 sc per round, for 5 rounds.
- Last Row: Shape the face piece with 6 sc, then 3 hdc for volume. Continue in rows, using decreases on sides to sculpt the face.
- Assembly: Attach face piece to head with whip stitches and a yarn needle.
Ears (Black Yarn)
- Round 1: MR, 8 sc.
- Round 2: 2 sc in each stitch (increase) - 16 sc.
- Round 3: 16 sc.
- Round 4: Repeat 1 sc, 1 inc - 24 sc.
- Round 5: Repeat 1 sc, 1 dec - 16 sc.
- Round 6: All decreases - 8 sc; close and leave a tail.

- Attachment: Sew both ears to the head at the second row position.
Body (Red and Black Yarn)
- Round 1: Using red yarn, MR, 7 sc.
- Round 2: 2 sc in each stitch - 14 sc.
- Rounds 3-5: 14 sc per round, 3 rounds.
- Color Change: Change to black yarn after Round 5.
- Rounds 6-7: 14 sc per round, 2 rounds in black.

- Attachment: Stuff lightly and sew the body to the head.
Limbs and Finishing
- Hands:
- MR, 3 sc with white yarn.
- Work 3 rounds; in the last round, switch to black yarn.
- Stuff lightly.
- Sew hands evenly to sides of the body.
- Feet:
- MR, 4 sc in yellow yarn.
- Second round: 6 sc (increase as directed).
- Stuff lightly.
- Sew both feet to the underside of the body.
- Tail:
- Attach black yarn strand to the back of the body.
- Use glue at the tip to prevent fraying.
- Facial Features:
- Embroider the eyes and nose with black yarn, shaping them carefully for best effect.

Assembly & Finished Size
- Arrange and attach all parts in correct anatomical positions for a balanced and neat look.
- Hide all yarn ends inside the body or head.
- Finished size: 7-10 cm tall and 4-6 cm wide once assembled and stuffed.
Conclusion and Ending Words
By following each step and round as detailed above, the resulting piece captures Mickey Mouse's friendly features and recognizable silhouette. The careful placement of color changes, face details, and shaped ears ensures accuracy and charm. Attaching each component with precision provides stability for the finished amigurumi, making it suitable for a keepsake, gift, or keychain. These structured instructions allow for a consistent and satisfying result, whether you aim for a classic or subtly personalized version. Patience and attention to each bullet point will guide you smoothly to a cheerful, handmade creation with enduring character.