
Warm your head with this free crochet men's hat pattern that's stylish simple and perfect for any man seeking comfort and a unique look.
A good hat can make any man feel special by giving warmth and style together. With just yarn and a hook you can make a strong and soft hat for daily life. This idea does not need hard or confusing steps; each round is made by putting yarn over and lifting again and again. Even if someone never made hats before this way is simple and fun. The crochet men's hat pattern brings comfort for the head and also keeps ears safe from the cold or wind outside. You can make it bigger or smaller to fit every head just right and the hat stays in place all day.
Such a hat can be worn in every place like walking on the street waiting for the bus or working outside. It is good for all seasons: thick yarn keeps you warm in winter while light yarn cools you in spring or fall. Some people like one color while others want stripes or mixed shades-the pattern is good for both. You do not need to buy expensive hats in shops when making one at home lets you pick the style and size you like best without any trouble.
Effortless Free Crochet Men's Hat Pattern That Stands Out
It has a textured finish that makes the hat look unique and handmade, adding a charming touch to any outfit. The pattern provides clear steps to guide you through the process, ensuring you create a well fitting hat that matches the head circumference perfectly. This hat is not just practical, but also a thoughtful gift idea for family and friends. Try this pattern and enjoy making something stylish and useful with your own hands.

Washing and drying is easy since the hat keeps its shape and lasts a long time. Making a hat with your own hands can bring a smile and makes a great gift for family and friends too. Finishing the hat builds confidence and brings a feeling of pride. Using the crochet men's hat pattern is a smart way to save money use up leftover yarn and give a personal touch to every day. Every head feels warmer and happier with handmade care showing love in every stitch.
Classy Crochet Men's Hat Pattern
Materials:
- Yarn:
- Length: 170 meters in 100 grams; composition: 25% wool, 75% acrylic.
- Quantity: Approximately 1.5 skeins.
- Crochet Hook: 4.5 mm.
- Additional Tools:
- Tapestry needle (for weaving in or tightening the yarn during finishing).
Key Abbreviations (US Terminology):
- ch: chain
- sc: single crochet
- sl st: slip stitch
- st(s): stitch(es)
- BL: back loop
Special Notes:
- Pattern is worked in rows and seamed at the end.
- Always turn your work after the turning chain unless otherwise indicated.
- The number of stitches for each section (single crochets and slip stitches) forms the ribbed structure of the hat.
- Adjust length by increasing or decreasing the foundation chain or the number of row repeats to fit different head sizes.
Special Techniques:
- Single Crochet (SC): Insert your hook, yarn over, pull through, yarn over again, and pull through both loops on the hook.
- Slip Stitch (SS): Insert your hook, yarn over, pull through the stitch and the loop on the hook.
- Working through back loops: Insert the hook into the back loop of the stitch instead of the full stitch for a textured effect.
- Foundation Chain: Create a row of chains to work your base stitches.
Pattern Instructions:
1. Foundation Chain
- Begin by making a starting chain of 52 chains.
2. First Row
- Insert your hook into the second chain from the hook. Work 1 single crochet (SC) into this stitch.
- Work 40 more single crochets (SC) into the subsequent stitches. You should have completed a total of 41 single crochets.
- Next, work 5 slip stitches (SS) into the next stitches.
- Chain 1 (turning chain) and turn your work.
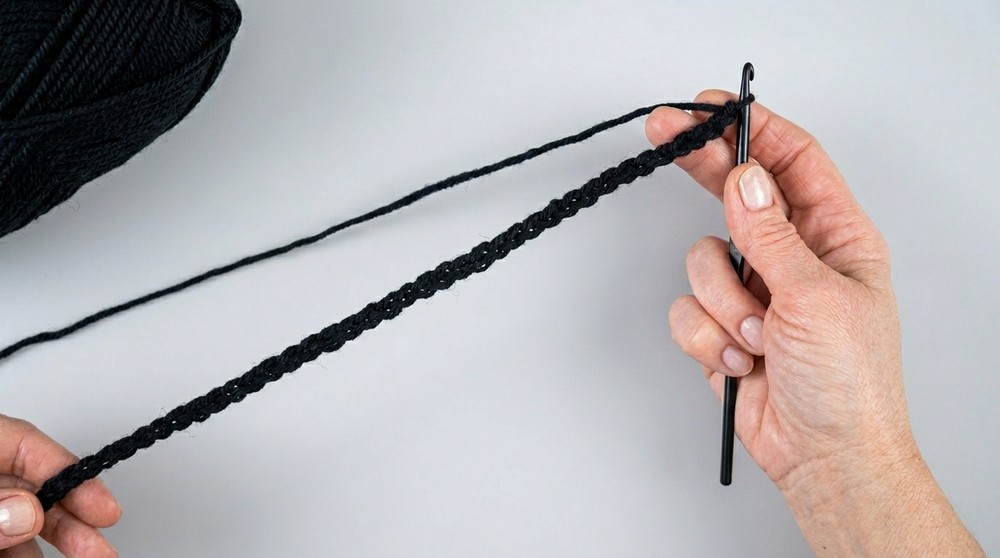
To make this men's crochet hat, you'll start by creating a foundation chain of 52 chains, which sets up the height for the entire hat body. Work a single crochet into the second chain from the hook, then continue with single crochets for the next 40 stitches. Once you've completed these 41 single crochets, transition to working slip stitches in the next 5 chains-this helps create ribbing along the edge.
3. Second Row
- Work 5 slip stitches (SS) through the back loops only in the first 5 stitches.
- Continue by working 41 single crochets (SC) into the subsequent stitches.
- Chain 1 (turning chain) and turn your work.
4. Third Row
- Work 41 single crochets (SC) in the first 41 stitches.
- Then, work 10 slip stitches (SS) into the next 10 stitches.
- Chain 1 (turning chain) and turn your work.

When you finish the row, make one turning chain and turn your work. For the second row, you'll begin with 5 slip stitches through the back loops, giving a stretchy and textured finish, and then work single crochets through the back loops in the next 41 stitches. After completing the row, chain one and turn again.
5. Fourth Row
- Begin by working 10 slip stitches (SS) into the first 10 stitches.
- Follow up with 41 single crochets (SC) into the next 41 stitches.
- Chain 1 (turning chain) and turn your work.
6. Continue Crocheting
- Repeat the First, Second, Third, and Fourth rows, alternating the rows, until the piece reaches the desired length to fit the specific head circumference (58-60 cm as per the pattern).
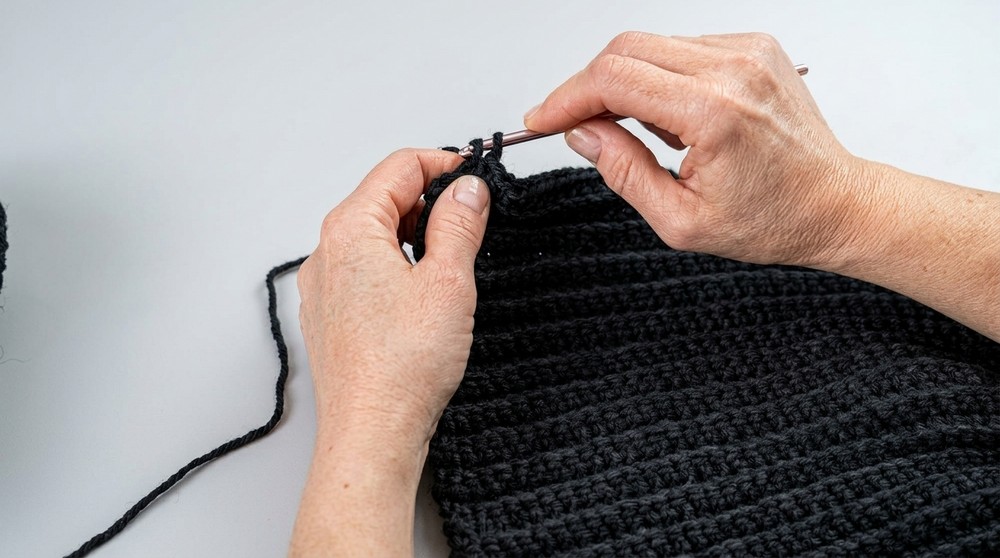
The next row reverses the order: work single crochets in the first 41 stitches, then 10 slip stitches, always into the back loops for a neat ribbed effect. The pattern continues to alternate these row types, switching the count and placement of single crochets and slip stitches to build the unique textured panels that shape the hat.
Finishing the Hat
1. Folding and Seaming
- Once your piece is completed to the desired size, fold it into a hat shape.
2. Seaming with Slip Stitches
- Work slip stitches (SS) along the edge of the folded fabric. This will join the edges, forming the base of the hat.
As you move into the middle section of the process, keep repeating the established sequence-alternating rows 1, 2, 3, and 4-until the crocheted rectangle measures the length needed to fit comfortably around the intended head size.
3. Tightening the Top
- Thread a tapestry needle with yarn.
- Insert the needle into the stitches along the top opening of the hat.
- Pull the yarn tight to cinch the top of the hat securely.
- Fix the yarn firmly in place and weave in the ends for a clean finish.

This creates a stretchy, close-fitting rectangle with varying ribbing sections. When it's long enough, fold the hat in half lengthwise to bring the short edges together. Use slip stitches to seam these short ends, forming a tube. To finish, use a tapestry needle threaded with yarn to weave evenly through the edge stitches of one open end of the tube. Gently pull the yarn to gather the fabric, cinching the top closed, and fasten off securely. The hat is now ready to wear.
Final Words:
Congratulations, You've created a cozy and warm crochet hat that's perfect for keeping you snug during cooler days. This pattern is ideal for beginners and experienced crocheters alike, combining simple techniques with a lovely textured design.

Pattern Correction:
- If the hat is too tight or too loose, adjust the foundation chain and the number of repeats.
- For a different size, modify the initial chain length (keeping the ratio between slip stitches and single crochets as desired) and repeat until you
- reach the needed circumference.
Tips to Maintain the Pattern:
- Yarn Care: Choose yarn that is soft yet durable and easy to maintain. Machine washable yarn is recommended for practicality.
- Sizing: Adjust the number of chains in the foundation row to modify the size of the hat if needed. Ensure the head circumference matches the recipient.
- Neat Finishing: Work carefully while weaving in the yarn ends and tightening the top of the hat to achieve a clean look.
- Customization: Add a pompom or decorative embellishments to personalize your hat further.
- Practice Techniques: If you are new to slip stitches or working through back loops, practice these techniques before starting the pattern.
Enjoy your completed crochet hat and continue exploring new designs for friends, family, or yourself.