
Carry your daily favorites with the Crochet Saddle Shoulder Bag Pattern, a curved and stylish purse for weekend trips and casual outfits.
Find the charm and versatility of the crochet bag, beautifully presented by the GÖKTÜRK AİLESİ YouTube channel. This tutorial offers not only step-by-step guidance but also inspiration for creating a stylish accessory that seamlessly blends function and fashion. The original creator's design shines with a blend of practicality and elegance, making it a must-try project for those looking to elevate their accessory game. The Crochet Saddle Shoulder Bag Pattern is especially perfect for spring and autumn, when layering is key and you want a bag that complements your transitional wardrobe pieces.
Chic Crochet Saddle Shoulder Bag Free Pattern To Match Your Outfits
This saddle shoulder bag boasts a timeless style that suits a wide range of outfits, from casual daywear to polished evening looks. Its comfortable fit and adjustable strap make it ideal for daily use, whether you're heading to brunch with friends, running errands, or exploring a weekend market.
The beauty of this bag lies not only in its appearance but also in its adaptability. It pairs effortlessly with denim, light jackets, and flowy dresses alike, adding a touch of handmade charm without overwhelming your ensemble. You can carry it confidently at day events or casual nights out, making it a go-to addition for your collection. The subtle yet distinctive shape mimics the classic saddle bag silhouette, lending a vintage flair with a fresh, modern twist.
Texturally, the bag captivates with a richly detailed stitch pattern that adds depth and visual interest. The standout design features include a structured flap closure that ensures security while maintaining an elegant profile. The interplay of tight stitches and soft yarn creates a durable yet tactile feel, perfect for those who appreciate both aesthetics and longevity in their accessories. Dive into the full tutorial to uncover how these elements come together in this must-have Crochet Saddle Shoulder Bag Pattern.
Modern Crochet Saddle Shoulder Bag Free Pattern
Paper yarn bags offer a distinctive blend of durability and aesthetic appeal. Working with paper fibers enhances stitch definition, giving a crisp, structured look. This satchel brings two colors together in alternating blocks of solid double crochet and mesh squares, providing visual interest and gentle contrast. The alternating row technique is a straightforward approach, suitable for those seeking efficiency and clarity in their projects. A continuous panel minimizes seams, allowing for smooth transitions in texture and color. Strategic folding delivers a satchel silhouette with defined lines and functional proportions. Incorporating fabric lining not only improves longevity but ensures the interior remains clean and practical. Decorative edge motifs and leather hardware introduce refinement and utility, turning a simple crocheted rectangle into a comfortable, functional accessory. Working patiently through each stage yields a satisfying result-an attractive, durable addition to any wardrobe.
Quick Overview Of Pattern
- Crochet a long, rectangular single panel using two colors of paper yarn.
- Alternate between blocks of solid double crochet rows and mesh square rows.
- Change colors between each block using a careful transition method.
- Fold the finished panel in a specific way to form the satchel shape.
- Line the inside with fabric and hand-sew the edges.
- Join the sides with single crochet for durability.
- Crochet decorative edge motifs around the opening.
- Add leather hardware, D-rings, and a snap closure for complete functionality.
Notes
- Use paper yarn, but other strong, inelastic yarns are also possible.
- Select your hook (3 mm or 3.5 mm) according to yarn thickness and your crochet tension.
- Maintain an even tension, especially important for paper yarn to avoid splitting or breaking.
- The color change method and folding technique are crucial for even, attractive results.
- Lining is recommended for a professional finish but can be omitted for a casual look.

Skill Level
Confident Beginner to Intermediate
Requires basic crocheting skills: chain, double crochet, single crochet, color change techniques, and light hand-sewing.
Materials
- Yarn: Paper yarn, brown and black (approx. 1 ball of each)
- Hook: 3.5 mm or 3 mm, matching your yarn
- Embroidery needle (sharp, large eye that fits yarn)
- Leather bag hardware: Snap fastener, 2 D-shaped rings
- Lining fabric: Brown or coordinating color
- Scissors
- Measuring tape
Measurements / Sizing
- Finished panel: approx. 42 cm (width) x 42 cm (length)
- Bag after folding: approx. 26 cm wide x 18 cm tall (not including handle)
- Strap: Length optional, according to preference
Gauge & Stitch Pattern
- Gauge is not critical, but sample swatches ensure panel fits finished dimensions.
- Solid rows: double crochet (dc)
- Mesh rows: (dc, ch 1, skip 1, dc)
- Each solid row: 50 dc
- Each mesh row: 25 squares
Stitch Abbreviations
| Abbreviation | Meaning |
|---|---|
| ch | chain |
| sc | single crochet |
| dc | double crochet |
| hdc | half double crochet |
| sl st | slip stitch |
| sp | space |
Special Stitches
- Mesh square: (dc, ch 1, skip 1 st, dc), forming small open squares
- Decorative cluster motif: (hdc, 3 dc, hdc into same st), forms rounded trim
The Crochet Pattern
Crocheting the Panel
Round 1: Foundation Chain & First Row
- With brown yarn, leave a long tail.
- Ch 50 loosely for base, then ch 3 extra (counts as first dc).
- Turn. Begin in single back loop of the 50th chain from hook.

- Work 50 dc across, inserting hook only into back loop for a flat edge.

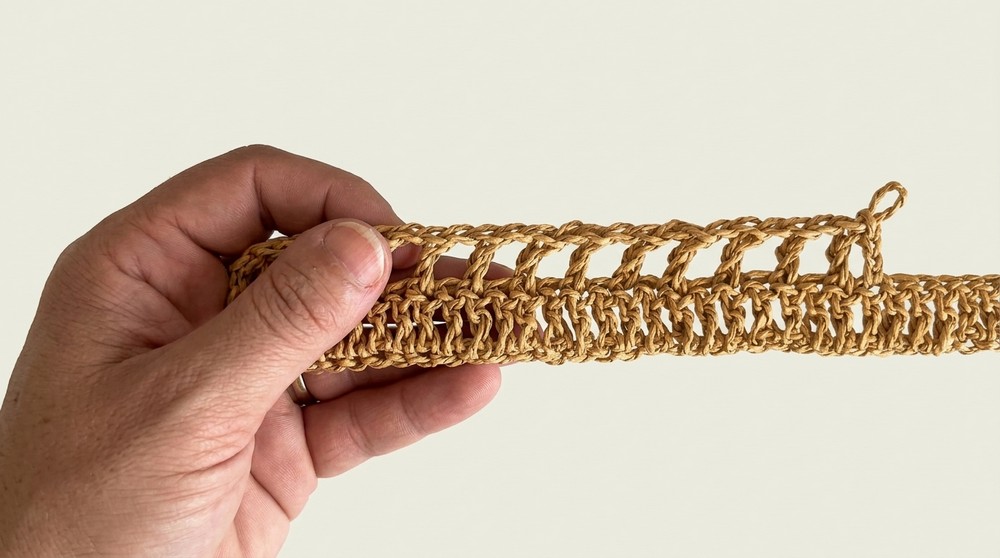
Round 2: First Mesh Row
- Ch 3, turn (acts as 1st dc).
- [Mesh pattern]:
- Skip first st (under ch-3), dc into top of next st.
- Ch 1, skip next st, dc in next st.
-
- Repeat (ch 1, skip 1, dc into next) across row to create open boxes.
- At end, finish with dc into top of the previous row's turning ch.
- You will have 25 mesh squares.
Round 3: Solid Double Crochet Row
- Ch 3, turn.
- Dc into the ch-1 sp of mesh, then dc into top of dc from previous row.
- Alternate: dc in space, dc in stitch.
- Count to ensure 50 dc at end of row.
Rounds 4-21: Alternating Stripes & Color Changes
- Continue alternating:
- 1 solid (50 dc), 1 mesh (25 mesh squares)
- Each block: 11 solid dc rows, 10 mesh rows per color.
- Changing color:
- On last dc of final row before switch, complete until last 2 loops on hook.
- Drop old color, place new color on hook, pull through, and continue.
- Tie tail ends securely-split and knot paper yarn ends so they won't fray.
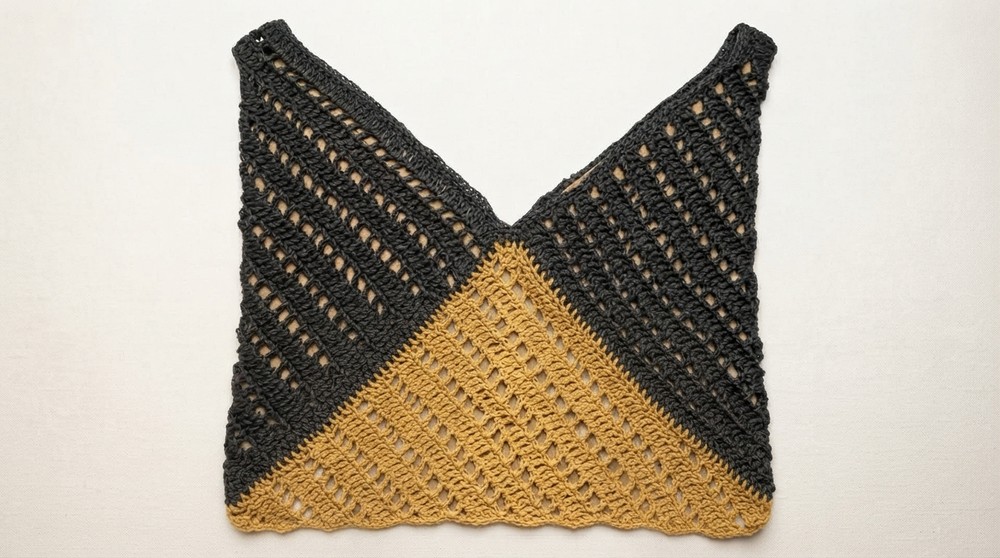
- After three color segments (black → brown → black, or vice versa), you should have a panel about 42x42 cm.

Forming the Bag
Block Folding
- Place the panel flat on your table.
- Fold the bottom edge up, then top/right side down, following the shown pattern, to get the satchel shape.
- Align all edges and ensure the folds meet neatly.
- The last 'flap' serves as the bag's closing cover.
Lining the Bag
Fabric Cutting
- Place the flat crochet panel on your lining fabric.
- Mark 1-2 cm seam allowance around all sides.
- Cut fabric accordingly.
Attaching Lining
- Fold lining's seam allowances inward (about 1-2 cm)
- Pin to fit just inside the crochet rectangle, just below the upper edge.
- Using matching thread and a needle, sew the lining to the bag by catching tiny loops from under the lining fold and the inside of the crochet, all the way around.
Joining the Sides
Side Seam Closure
- With folded bag, locate and align open side edges.
- Starting at top, attach yarn.
- Work sc through both layers from top to base, joining sides.
- Keep slack moderate to prevent puckering.
- Repeat on other side.
Edging and Motif Decoration
Round Top Edging
- Attach yarn to opening edge.
- Work 1 round of sc evenly around the entire bag opening for a tidy, stable rim.
Decorative Edge Motifs
- Begin at desired point (e.g., bag base corners).
- Ch 2 (counts as hdc). Into same stitch: 3 dc, 1 hdc (all in same stitch).
- Sl st into next sc.
- Repeat motif clusters at even intervals along the lower and back edges for a playful finish.
Hardware and Finishing
Attaching Hardware
- Sew one D-ring securely to each upper side using yarn and a needle.
- For the snap:
- Split paper yarn for a thinner thread.
- Thread through an embroidery needle.
- Knot end and sew the snap's leather tabs to the bag flap and front, using leather's pre-made holes.
Final Assembly
- Attach your chosen strap to both D-rings.
- Tidy up all ends, ensuring hardware and lining are secure.

Assembly & Finished Size
- Final bag: approx. 26 cm (width) x 18 cm (height) after folding and seaming.
- Interior is lined, protecting contents and providing a professional look.
- Strong single-crochet seams and secure hardware make the piece practical for daily use.
Conclusion and Ending Words
Completing this satchel demonstrates the versatility of paper yarn and the effectiveness of alternating solid and mesh rows. The well-planned folding and edge finishing techniques yield structure and provide stability for everyday use. By including a sewn lining and integrating hardware, the bag achieves both functionality and elegance, ready to accommodate essential items securely. Each step contributes to the finished piece, from the precision of the foundation chain to the careful attachment of D-rings and snap closure. Focusing on quality materials and tidy construction ensures lasting satisfaction and confidence in the bag's usability. With thoughtful color choices and practical design decisions, this project reflects both artistry and purpose. Adhering to measured instructions and maintaining attention to detail pays off with a result that is visually appealing, robust, and comfortable for daily carrying.