
Show your love for crochet hair tie pattern with unique styles that combine charm & practicality for everyday or special occasions.
Everyday hairstyles deserve a touch of charm, and what better way to add it than with a handmade hair accessory? A crochet hair tie pattern offers a delightful way to combine functionality with beauty, allowing you to upgrade casual ponytails or buns effortlessly. Lightweight yet durable, this pattern not only secure your hair comfortably but also add a pop of color, texture, or personality to your look.
Customizable and Stylish
This practical accessory doubles as a stylish addition to any outfit. Available in endless color options, you can match your crochet hair tie to your wardrobe, season, or mood. Whether you prefer soft pastel tones, bold, vibrant shades, or earthy neutrals, this pattern makes it easy to customize. Decorative elements such as ruffles, floral motifs, or playful loops can also be integrated to give your hair tie a unique flair.
Simple Crochet Hair Tie Pattern For Everyday Charm

Thoughtful and Versatile
Ideal for birthdays, holidays, or small gestures of appreciation, a handmade crochet hair tie is something the recipient will actually use and cherish. Additionally, they're an eco-friendly alternative to store-bought hair ties, crocheted with love and minimal materials. This pattern is simple yet rewarding, perfect for beginners and experienced crocheters alike. From tying back your hair for a workout to accessorizing for a date night, this versatile hair tie pattern bring practicality and personality to your everyday routine, one stitch at a time.

Why I Love this Pattern
- Simple Yet Fun: The pattern is easy to follow, making it perfect for both beginners and experienced crocheters.
- Quick to Make: Great for when you want a fast and satisfying project that doesn't take hours.
- Customizable: You can use any color, yarn type, or add embellishments for a personal touch.
- Eco-Friendly: It's a sustainable alternative to mass-produced hair ties.
- Practical Use: Keeps hair secure and stylish, perfect for any occasion.
- Great for Gifting: Makes thoughtful, handmade presents for friends and family.
- Small Yarn Requirement: Ideal for using up leftover yarn from other projects.
- Portable Project: Easy to carry around, so you can work on it anywhere.
- Affordable: Low-cost materials with a high-value outcome.
- Adds Personality: Turns a simple hair accessory into a one-of-a-kind fashion statement.
Skill Level
Intermediate: This project requires knowledge of basic stitches such as single crochet, treble crochet, and working in rounds. It also involves changing yarn colors and working evenly around a base (hairband or rope).
Materials Required
- Elastic Hairband or Rope: Choose a durable elastic band or rope as the base for your hair tie.
- Yarn:
- 4-ply cotton yarn, two colors (e.g., one for the body and one for the decorative edging).
- Hook: 2.0 mm crochet hook.
- Tapestry Needle: To weave in loose ends.
- Scissors: To cut yarn.
Key Abbreviations
- st: stitch
- sc: single crochet
- sl st: slip stitch
- ch: chain
- tr: treble crochet
Special Notes
- Base Wrapping: When crocheting around the hairband or rope, keep the stitches snug but not overly tight to avoid stretching the base.
- Color Change: Smoothly transition between yarn colors for neat edges.
- Edging Texture: The decorative chain-3 loops enhance the hair tie's design. Keep them evenly spaced for a professional finish.

crochet hair tie Pattern Instructions
Step 1: Wrap the Elastic Hairband with Single Crochet
- Attach your yarn to the hairband or rope with a slipknot.
- Begin working single crochet (sc) tightly around the hairband to fully cover its surface.
- Ensure that the single crochets are evenly spaced and snug against the band, leaving no gaps.

- Ensure that the single crochets are evenly spaced and snug against the band, leaving no gaps.
- When the hairband is fully covered, join the round with a slip stitch (sl st) into the first single crochet.
Step 2: Treble Crochet Ruffles
- Chain 3 (ch 3) to start the ruffle body. This chain counts as 1 treble crochet (tr).
- Into the same stitch, work 2 more treble crochets (2 tr). You now have a cluster of 3 treble crochets (3 tr) in the first stitch.
- Move to the next stitch and work 3 treble crochets (3 tr).
- Continue working 3 treble crochets in each stitch around until all single crochets are covered with ruffles. Ensure the ruffles are close together and evenly spaced for a flowing texture and volume.

- Join with a slip stitch (sl st) into the first chain-3 of the round.
Step 3: Fasten Off and Change Yarn
- Chain 1 (ch 1) and cut the yarn for the ruffles. Pull the tail through the loop and tighten to fasten off securely.
- Attach your second yarn color with a slip knot, and join it to any stitch along the ruffle edge with a slip stitch (sl st).

Step 4: Decorative Edging
- Chain 1 (ch 1) and work 1 single crochet (sc) into the same stitch where the yarn was joined.
- Chain 3 (ch 3) and skip to the next stitch. In that stitch, work 1 single crochet (sc).
- Repeat the pattern: ch 3, sc 1, continuing in this manner evenly around the entire ruffle edge.
- TIP: Keep your chain loops consistent in size to maintain an elegant finish.
- When you reach the end of the round, join with a slip stitch (sl st) to the first single crochet of the edging.
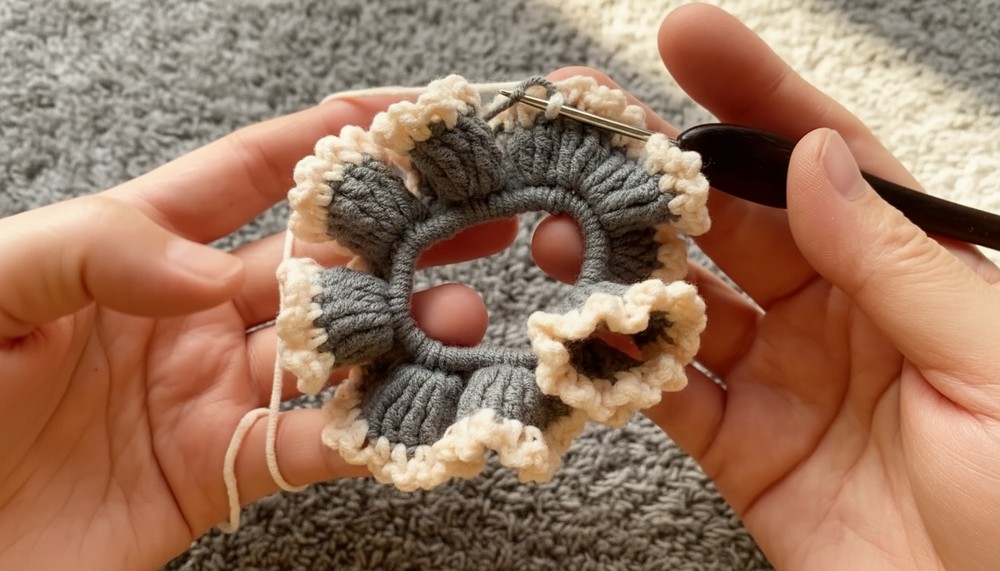
Step 5: Finishing
- Cut your yarn, leaving a short tail, and pull it through the loop to fasten off securely.
- Use a tapestry needle to weave in any loose ends and trim excess yarn.
- Lightly stretch the hair tie to ensure the stitches sit nicely without bunching.

Conclusion
This Crochet Hair Tie adds a handmade touch of elegance to your hair accessory collection. The snug single crochets, voluminous treble crochet ruffles, and delicate chain-3 edging unite to form a beautiful and functional hairpiece. Wear it yourself or gift it to friends and family-it's a versatile and lovely design.
Pattern Corrections and Debugging
- Uneven Ruffles: If your ruffles spread unevenly, check your stitch placement or increase the number of treble crochets per stitch to maintain fullness.
- Loose Edging: If the chain-3 loops feel loose, reduce their length to chain 2 for a tighter finish.
- Base Wrapping: If gaps appear in the base, push the single crochets together more tightly or add extra stitches to cover the hairband.
Tips for Success
- Tension: Keep consistent tension throughout the pattern, especially when wrapping the band in single crochets.
- Yarn Choice: Cotton yarn is ideal for hair ties as it holds its shape and is gentle on the hair.
- Customization: Experiment with different color combinations or try adding beads to the edging for a unique look.
Final Words
With this Crochet Hair Tie, you can elevate a simple elastic band into a charming and practical accessory suitable for daily use or special occasions. Its timeless design ensures your project will always be appreciated.