
Capture the playful spirit of puppies with this Crochet Dog Amigurumi Free Pattern and make a dog toy that children will love to treasure.
Bringing a tiny, lovable companion to life with just a needle and some yarn-no barking, no mess, just endless charm. This is exactly what you get with the Crochet Dog Amigurumi Pattern, brilliantly shared by Nancy a crochet in her YouTube tutorial. Full credit goes to her for this step-by-step guide that makes creating an adorable stuffed dog as simple as can be. This pattern results in a sweet, squeezable little pup that's perfect both as a heartfelt gift and as a delightful decoration for any room.
Heartwarming Crochet Dog Amigurumi Free Pattern to Gift a Friend
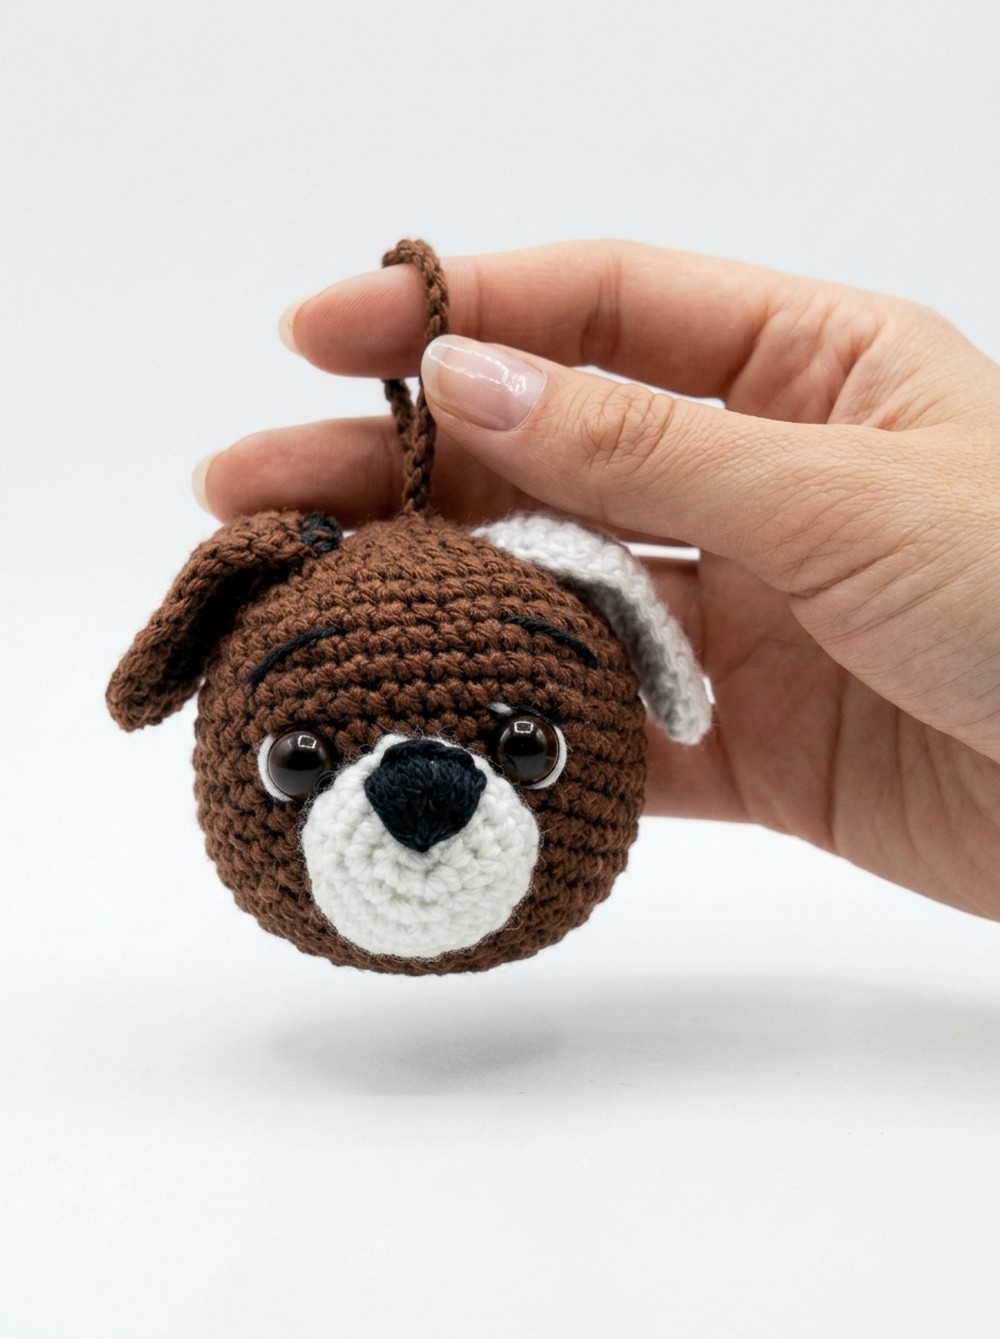
The Crochet Dog Amigurumi sits comfortably in your hand, featuring a round, soft head made from tightly stitched loops, giving it a plush and firm texture that holds its shape beautifully. Its shape is compact and approachable, with detailed features such as the gently embroidered snout and securely fastened eyes that add to its endearing expression. The pattern's style is charmingly simple yet full of personality-tiny ears that perk up, a little nose perfectly shaped and stitched, and a neat body that's both cuddly and sturdy.
What stands out most is the thoughtful attention to small details like the eyelashes embroidered delicately to give the dog a sweet, affectionate look, and the use of increases and decreases in stitches that sculpt its form smoothly. This adorable piece can hang as a keychain or sit proudly on a shelf, brightening your day or the day of someone you love. Whether for a beginner or someone looking for a quick, satisfying project, this pattern offers the joy of creating a lovable friend, sure to bring smiles and warm hearts wherever it goes.
Wonderful Crochet Dog Amigurumi Free Pattern
This project produces a charming animal head with magnetic and hanging options, following a structured process. The tutorial demonstrates each section-from crocheting the head base, snout, and ears to all finishing touches-using small quantities of thread and basic tools. Core portions include attention to stuffing, safety eye insertion, embroidered facial features, and practical assembly techniques, including the placement of a magnet and optional hanging loop. Every step is precisely outlined, ensuring clarity and replicability during each stage of construction. This pattern prioritizes careful color changes, secure fastenings, and clean shaping, enabling crafters to obtain a neat, presentable animal head with character and versatility.
Quick Overview Of Pattern
- Head base: Crocheted from the top down in the round; includes shaping increases/decreases.
- Snout: Worked separately, then sewn on; features a magnet and embroidered nose.
- Safety eyes: Placed between prescribed rounds for correct positioning.
- Ears: Crocheted flat in rows, edged with accent color, then attached above the eyes.
- Assembly: Consists of securing snout and ears, embroidering extra facial features, and fully closing and stuffing the head.
- Optional additions: Hanging loop and/or embedded magnet for multipurpose use.
Notes
- Use a stitch marker to identify the start of every round.
- Maintain tight, uniform stitches to keep stuffing secure and the final shape crisp.
- All color changes and finishing techniques should be implemented as described for best results.
- When placing safety eyes, double-check spacing for symmetry.
- Secure all pieces well, especially magnet and eyes, to prevent detachment during use.
Skill Level
- Beginner to Intermediate:
- Familiarity with crocheting in the round, increasing and decreasing, basic embroidery, and assembly of small amigurumi parts is required.
Materials
- Yarn / Thread: 1 mm thick; brown (main), plus small amounts for snout, accent edging, and embroidery in black.
- Crochet Hook: 2.0 mm.
- Safety Eyes: 1 pair, with back stoppers.
- Magnet: 1 small round magnet.
- Stuffing: Fiberfill or polyfill.
- Notions: Tapestry/yarn needle, stitch marker, fabric glue or hot silicone (optional), yarn/thread for hanging loop.
Measurements / Sizing
- Final size: Approximately 5-7 cm in diameter, varying slightly with thread and stuffing density.
Gauge
- Gauge: Not critical; ensure fabric is tight enough so stuffing and magnet do not show through.
- Suggested: 12-14 sc = 4 cm when worked in the round with 1 mm yarn and 2.0 mm hook.
Stitch Abbreviations
- ch: chain
- sc: single crochet
- inc: increase (2 sc in same st)
- dec: decrease (sc two together)
- sl st: slip stitch
- st(s): stitch(es)
- MR: magic ring
Special Stitches
- Invisible decrease: Insert hook into the front loops of next two stitches, yarn over, pull through both loops, yarn over again, pull through remaining loops.
- Magic ring: Create an adjustable ring by wrapping yarn and working stitches directly into the loop, which is then pulled tight.
The Crochet Pattern
Head
Base Setup & Increases
- Round 1: Start with a magic ring, work 6 sc into the ring. Pull tight and join with a sl st. (6 sts)

- Round 2: Work 2 sc in each st around (6 increases). (12 sts)
- Round 3: [1 sc, 1 inc]; repeat 6 times around. (18 sts)
- Round 4: [2 sc, 1 inc]; repeat 6 times around. (24 sts)
- Round 5: [3 sc, 1 inc]; repeat 6 times around. (30 sts)
- Round 6: [4 sc, 1 inc]; repeat 6 times around. (36 sts)
- Round 7: [5 sc, 1 inc]; repeat 6 times around. (42 sts)
Main Shape
- Rounds 8-15: 1 sc in each st around. (42 sts per round)

Decreases & Safety Eye Placement
- Round 16: [5 sc, 1 dec]; repeat 6 times around. (36 sts)
- Eye Placement: Insert safety eyes between Rounds 12 and 13, spaced 5 sts apart. Secure with backings (optionally add glue before attaching).
- Round 17: [4 sc, 1 dec]; repeat 6 times around. (30 sts)
- Optional Hanging Loop: Before closing, chain 25, insert loop through top center from inside to out, tie securely and tuck knot.
- Round 18: [3 sc, 1 dec]; repeat 6 times around. (24 sts)
- Round 19: [2 sc, 1 dec]; repeat 6 times around. (18 sts)
- Stuffing: Begin stuffing head firmly.
- Round 20: [1 sc, 1 dec]; repeat 6 times around. (12 sts)
- Round 21: 6 dec. Fasten off, thread tail through final 6 sts with needle, pull tight, and hide end.
Snout
Crocheting the Snout
- Round 1: Start with a magic ring, work 6 sc into ring, pull tight, and sl st to join. (6 sts)
- Round 2: 2 sc in each st around (6 increases). (12 sts)
- Round 3: [1 sc, 1 inc]; repeat 6 times around. (18 sts)
- Rounds 4-5: 1 sc in each st around. (18 sts per round)
Embroidery & Magnet Assembly
- Nose: With black thread, embroider a small triangle nose centered on the front of the snout.

- Magnet: Place a small round magnet inside the flat back of snout.
- Stuffing: Insert a minimal amount of fiberfill behind the magnet for shape.
- Assembly: Position snout on the lower center of the head, directly beneath eyes. Sew securely around its edge to affix.
- Eyelashes: With black thread, embroider two short, diagonal lines at the outer corner of each eye.
Ears (Make 2)
Main Ear Body
- Row 1: Chain 8. Beginning in the 2nd chain from hook, sc in each chain across. Turn. (7 sts)
- Row 2: Ch 1, turn, sc in each of the 7 sts. (7 sts)
- Row 3: Ch 1, turn, skip 1st st, sc in next 6. (6 sts)
- Row 4: Ch 1, turn, skip 1st st, sc in next 5. (5 sts)
- Row 5: Ch 1, turn, skip 1st st, sc in next 4. (4 sts)
- Row 6: Ch 1, turn, sc in each of the 4. (4 sts)
- Row 7: Ch 1, turn, skip 1st st, sc in next 3. (3 sts)
- Row 8: Ch 1, turn, skip 1st st, sc in next 2. (2 sts)
- Row 9: Ch 1, turn, skip 1st st, sc in next 1. Fasten off. (1 st)
Border & Attachment
- Edging: Join accent color yarn/thread. Sc evenly around entire ear, working [1 sc, 1 inc] around corners/tips for smooth curves.

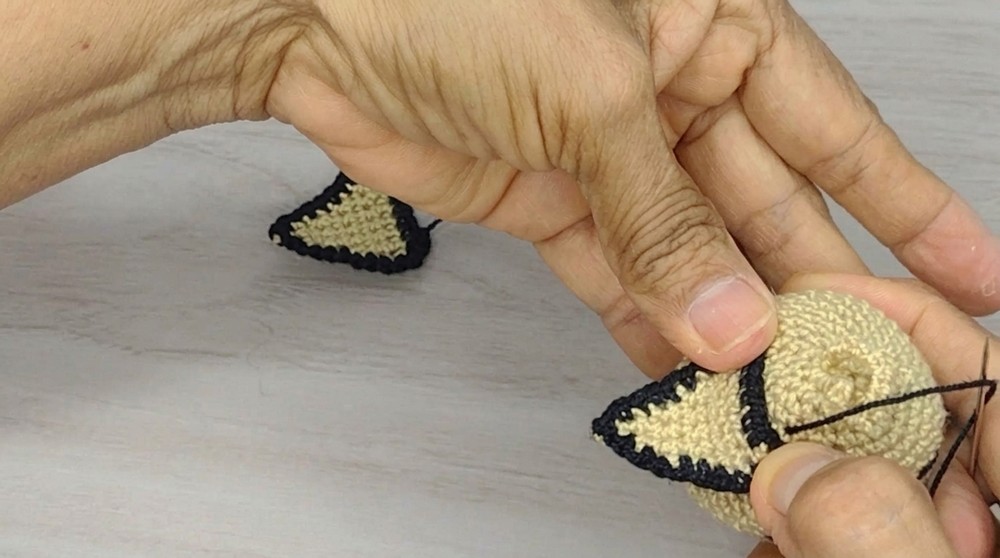
- Attachment: Place ears on head, aligned slightly above eye level (about at Round 3 of head). Sew edges securely on both sides.
Assembly & Finished Size
- Sew the snout in place below safety eyes, covering stuffing opening if visible.
- Embroider nose and eyelashes for facial expression.
- Affix ears symmetrically along upper head, using tight stitches to ensure stability.
- Insert hanging loop or glue in place, if using.
- Ensure magnet is positioned firmly and that stuffing is well distributed in the head, adjusting before final closure.
- Check neatness of seams and tension, hiding all yarn tails within the work.

Finished Size: Approximately 5-7 centimeters in diameter when worked as described.
Conclusion and Ending Words
Completing this project results in a small amigurumi head with both visual and functional appeal. The combination of systematic increases, careful stitch control, and precise placement of details-including snout, safety eyes, and ears-promotes a cohesive and attractive result. The finished item adapts easily to various uses, whether as a fridge magnet, ornament, or attachment for personal accessories. Including a magnet and/or hanging option increases the versatility of the piece. Each step, from the magic ring foundation to the final attachment of ears and details, reinforces essential crochet skills in the realm of miniature construction. This animal head magnet stands as a thoughtful gift idea, a decorative addition to any space, or a creative expression to enhance collections. Attention to all assembly and shaping guidelines ensures that the piece is durable and consistently shaped, ready for decorating or sharing. 