
Protect yourself from the cold while styling your hair with this Free Crochet Ponytail Hat Pattern, offering a warm look & cozy feel.
A few weeks ago,, I realized how frustrating it can be to wear a regular hat when I have my hair in a ponytail or messy bun. That's what makes this crochet ponytail hat pattern such a fun and useful project! It's a simple pattern that keeps your head warm while leaving space at the top for your hair. You can make it in any colors you like-soft neutrals, bright pops of color, or even playful stripes. The hat pattern looks stylish and is great for daily wear, winter walks, or even when you're heading out for a jog. It's practical, pretty, and, most importantly, beginner-friendly!
Free Crochet Ponytail Hat Pattern Perfect Fit for Any Head

What makes this hat stand out is the third-loop half double crochet stitch. Not only does it create a unique ridged texture for added character, but it also opens doors to crocheting other items like scarves, textured cowls, or beanies. The pattern introduces you to techniques such as front post half double crochet for additional design elements, and a clever way to decrease while shaping the crown. For the finishing touch, the ponytail band incorporates an elastic hair tie with single crochet stitches, blending beauty and convenience.
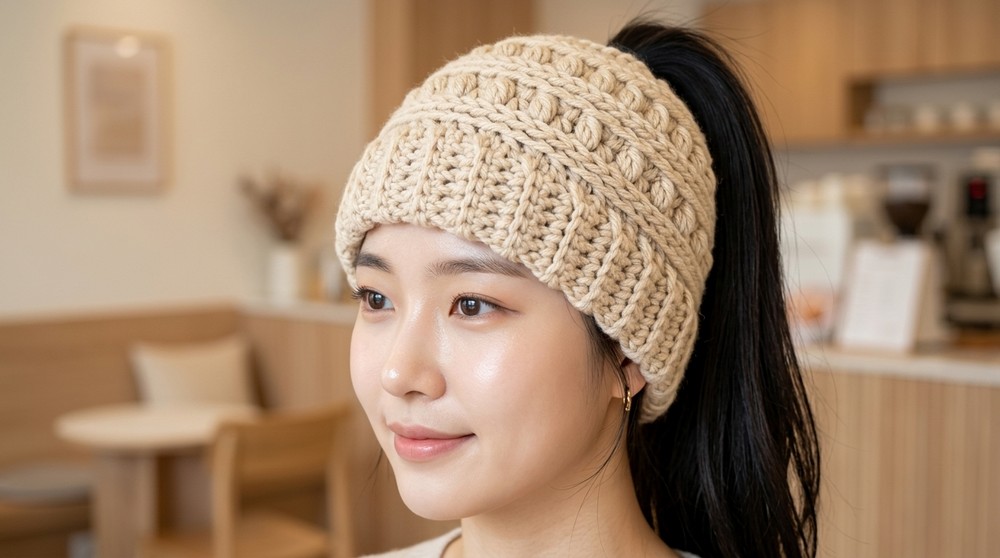
As you work through this pattern, you'll gain confidence in creating textured stitches, joining seams invisibly, and working with decreases efficiently. These skills go beyond hats and can help you explore patterns for headbands, bags, and even home accessories like baskets or cushions. The techniques are beginner-friendly yet add professional-level details to your projects, ensuring they're both durable and stylish.
What You Can Make With These Skills
- Textured beanies or bun hats.
- Stylish headbands in various colors and formats.
- Cozy scarves or cowls with ridged designs.
- Practical baskets, like rope baskets with firm texture.
- Home décor items like pillow covers with unique stitching patterns.
This crochet ponytail hat pattern introduces modern design ideas while remaining stress-free and ideal for beginners. Give it a try, and you may just love how seamlessly it fits into your crochet repertoire.

Step-by-Step Crochet Pattern: Elastic Brim Hat
Skill Level
Intermediate: The pattern includes techniques such as back-loop-only stitches, front post half-double crochet, working with an elastic, and completing an invisible close.
Gauge
Using a 5 mm crochet hook and worsted-weight yarn, 14 stitches and 14 rows of single crochet (worked in the back loop only) yield a 4" x 4" (10 cm x 10 cm) swatch.
Finished Size
- Brim Length: 17-20 inches (44-51 cm), adjustable to your head circumference.
- Hat Length: About 7 inches (18 cm) before finishing with the elastic band, customizable based on preferences.
Materials
- Yarn (Worsted Weight or #4):
- Beige color usd in the pattern or any color of your choice. A finer yarn can be used with a smaller hook to achieve finer details.
- Hook Sizes:
- 5.0 mm Crochet Hook: For main body of the hat.
- Optional: 4.0 mm Hook for finer detailing.
- Elastic Hair Tie:
- Used to finish the top of the hat securely.
- Additional Supplies:
- Scissors.
- Darning/Tapestry Needle: For finishing and weaving in ends.
Key Abbreviations (US Terminology)
| Abbreviation | Meaning |
|---|---|
| ch | Chain |
| sc | Single Crochet |
| hdc | Half Double Crochet |
| sl st | Slip Stitch |
| fp hdc | Front Post Half Double Crochet |
| BLO | Back Loop Only |
| rev sc | Reverse Single Crochet |
| v-stitch | Visible chain stitch pattern created by working in third loop. |
Pattern Instructions
Step 1: Brim Construction
Foundation Chain:
- Slip Knot: Begin with a slip knot on your hook.
- Chain:
- Chain 13 (or create a chain measuring 5 inches / 13 cm).

- Customize the width by chaining longer or shorter lengths to suit your preference.
- Chain 13 (or create a chain measuring 5 inches / 13 cm).
Row 1:
- Starting in 2nd chain from hook: Work 1 sc across the row.
- End of row: Ch 1, turn.
Row 2 (Back Loop Only):
- Starting in first sc: Work 1 sc into the BLO of each stitch across the row.
- End of row: Be sure not to miss the last hidden stitch. Ch 1, turn.
- Repeat Row 2:
- Continue working until the brim measures 17-20 inches (44-51 cm) or fits snugly around your head. Ensure an even number of rows for symmetry.

- Continue working until the brim measures 17-20 inches (44-51 cm) or fits snugly around your head. Ensure an even number of rows for symmetry.
Joins for the Brim:
- Fold the Brim in Half:
- Insert hook into the last sc made and the chain stitch on the opposite side.
- Sl st to join, and continue slip stitching down the row.
- Finished Seam:
- The seam will create a subtle bump on the inside and a clean finish on the outside.
Step 2: Hat Body
Foundation Round:
- Fold the Brim Lengthwise:
- Match up the rows to work along the edge.
- Ch 1.
- Single Crochet:
- Work 1 sc into the end of each row, connecting the front and the back of the brim.
- Ensure rows line up evenly as you progress.
- Joining:
- Sl st into the top of the first sc to join the round.
- Ch 1.
Round 1:
- Front Post Half Double Crochet:
- Work 1 fp hdc into the first stitch.
- Half Double Crochet:
- Work 1 hdc into the next stitch.
- Repeat:
- Alternate between fp hdc and hdc around the row.
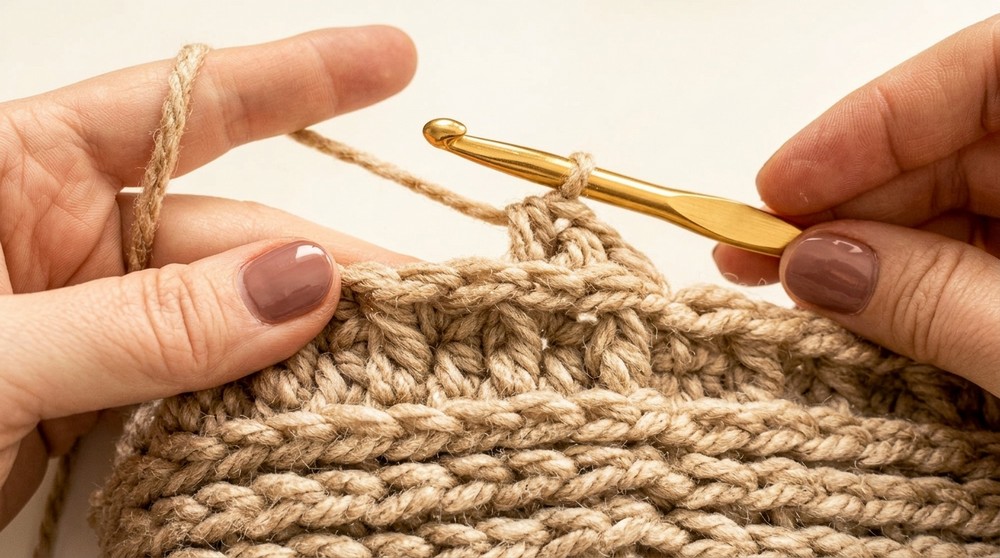
- Alternate between fp hdc and hdc around the row.
- End of Round:
- Sl st into the fp hdc from the previous row, pulling the loop to the back snugly. Ch 1.
Round 2:
- Half Double Crochet in Third Loop:
- Insert hook into the third loop at the back of the stitch for a sculpted v-stitch appearance.
- Repeat:
- Work hdc into the third loop around the row.
- Joining:
- Sl st from the back into the chain stitch below and pull snug. Ch 1.
Rounds 3-6:
- Repeat the Last Two Rows:
- Alternate between fp hdc/hdc and hdc in the third loop to form a visible v-pattern.
Hat Length:
Continue the fp hdc/third-loop hdc repeat until the hat measures about 7 inches (18 cm) from the brim.
Step 3: Decrease for Top
First Decrease Round:
- Pattern:
- Work 2 hdc stitches, then 2 hdc together (decrease) around the row.
- Sl st, pull snug, and chain 1 at the end.
Second Decrease Round:
- Pattern:
- Continue decreasing (2 sc together) until the opening measures about twice the size of your hair elastic.
Step 4: Elastic Band
- Single Crochet Around Elastic:
- Chain 1, then work 1 sc over the elastic band, pulling the elastic snug into the stitches.
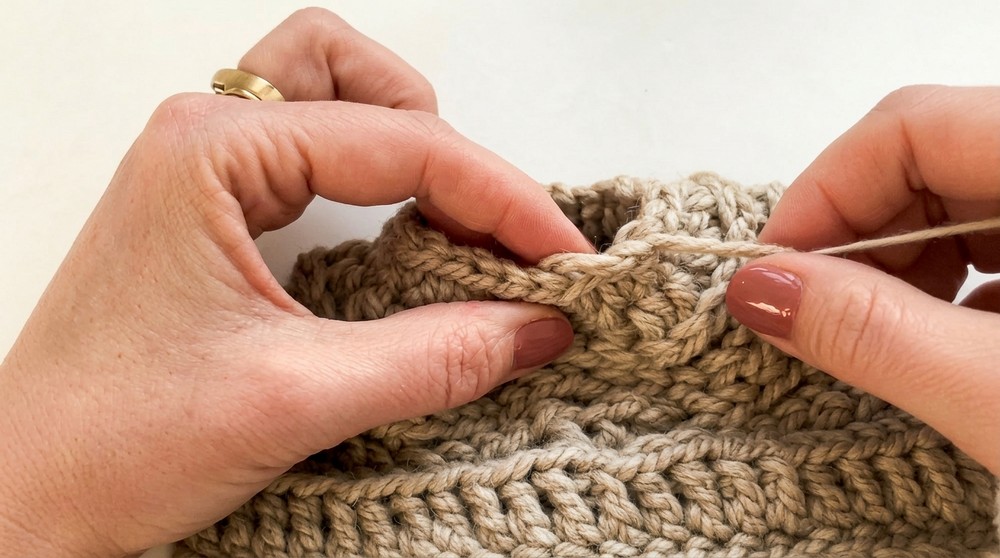
- Chain 1, then work 1 sc over the elastic band, pulling the elastic snug into the stitches.
- Joining:
- Cut the yarn and pull through. Use a darning needle to finish with an invisible close technique.
Step 5: Invisible Close and Weaving Ends
- Invisible Close:
- Insert the needle front to back through the first sc of the round below, then through the back of the last sc to create a seamless finish.
- Weave Ends:
- Turn the hat inside out and weave all loose ends securely into the back.
Customization Ideas
- Brim Width:
- Adjust the brim chain length to create wider or narrower folds.
- Hat Length:
- Add or reduce rows for a slouchy or fitted look.
- Yarn Variations:
- Try fine yarn for a delicate design. Adjust hook size to maintain appropriate tension.
- Decorative Band:
- Add a contrasting color or stitch pattern to the slip-stitched brim for an accent.
Tips for Success
- Consistent Tension:
- Work with tight and even tension for uniform stitches.
- Matching Rows:
- Ensure rows of the brim align precisely before joining, avoiding uneven seams.
- Decreasing Gradually:
- Focus on evenly spaced decreases for a smooth crown.
Conclusion
Congratulations! You've completed your Elastic Brim Hat, a cozy and adaptable accessory that pairs comfort with style. The brim's stretch and elastic finish ensure a perfect fit, while the visible v-stitch adds elegant detail. Share your hat with loved ones or customize it for gifting.
Important Remarks
- The straight seam ensures your hat looks neat and professional.
- This hat works beautifully with different yarn types, letting you explore bold textures or soft finishes.
- The elastic band finish creates a snug and practical crown closure.