
When I first started crocheting, I wanted to make something special for my mom's birthday. That's when I found a Free Crochet Rose Bouquet Pattern online, and it changed my whole idea of homemade gifts. Making each little rose by hand was simple and relaxing, but the finished bouquet looked as beautiful as real flowers from a store, only mine would last forever.
Unique Free Crochet Rose Bouquet Pattern for Stunning Flowers
What I loved most was how the pattern let me choose any colors I liked. I picked my mom's favorite shades of yellow and red, and each rose turned out with soft, round petals that curled just right. The bouquet looked full and lovely, with layers of petals and tiny green leaves that made the flowers look real. The texture was soft and slightly bumpy, thanks to the easy stitches, and the final arrangement looked charming in a glass jar.

This bouquet wasn't just a decoration. My mom put it on her bedside table, and it still reminds her of that special birthday. Crochet rose bouquets can be used for so many things, gifts, party decorations, or even wedding centerpieces. They're perfect for anyone who wants to give a handmade touch to their home or surprise someone with a present that never fades.
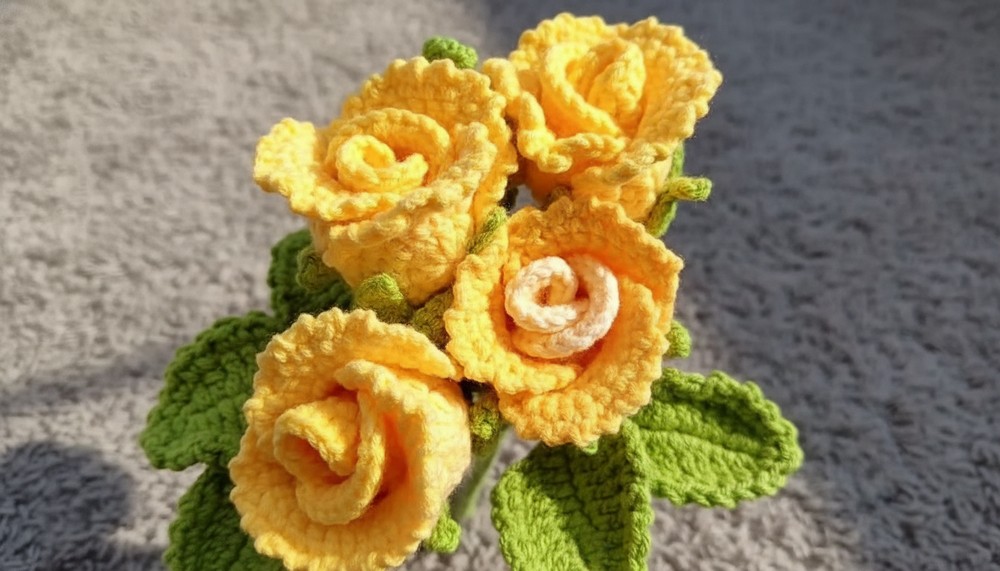
No matter if you're new to crochet or already have some experience, you'll find this pattern easy and fun to follow. All you need is some yarn and a hook, and soon you'll have a beautiful, lasting bouquet that's made with love.
Materials Needed
- Yarn: Weight 2 yarn in Sunshine Yellow (or petal color), green for the kaix and leaves.
- Crochet Hook: 2.5mm hook.
- Flower stem: Floral wire or a ready-made flower stem.
- Glue: Craft glue for attaching petals and stem components securely.
- Scissors: For trimming.
- Stitch markers: To mark the first stitch in a round.
- Optional: Wire for shaping the leaves.
Special Techniques
- Magic Ring: Creates a tight circle for starting rounds.
- Slip Stitch (sl st): Joins stitches or finishes rounds.
- Chain Stitch (ch): Forms the foundation of the crochet.
- Single Crochet (sc): Insert hook, yarn over, pull up a loop, yarn over, pull through both loops.
- Half Double Crochet (hdc): Yarn over, insert the hook, pull up a loop, yarn over, pull through all loops on the hook.
- Double Crochet (dc): Yarn over, insert hook, pull up a loop, yarn over, pull through two loops twice.
- Treble Crochet (tr): Yarn over twice, insert hook, pull up a loop, then yarn over and pull through two loops at a time until one loop remains.
- Increase: Work 2 stitches in the same space.
- Decrease: Combine stitches by pulling up loops and closing them together.
- Pico Stitch: A small decorative bump made with chain stitches.
Pattern Instructions
Step 1: Small Petals
- Foundation: Create a magic ring.

- Round 1: Work 10 Double Crochets (dc) into the ring. When finished, pull the yarn tail to close the ring. Use a stitch marker to mark the first dc if needed. Slip stitch (sl st) to join round.
- Round 2:
- Chain 2 (does not count as a stitch).
- Work 10 Half Double Crochet (hdc) increases (2 hdc in each stitch around). Total: 20 stitches.
- Sl st to join the round.

- Round 3:
- Chain 1. Single crochet 6 (mark the first stitch).
- Work 8 hdc increases (16 stitches).
- Single crochet the last 6 stitches. Sl st to join and chain 1.
- Cut yarn, weave in ends.

Repeat to make 2 small petals.
Step 2: Large Petals
- Follow Round 1 and Round 2 from the small petals. Mark your first stitch as needed.
- Round 3:
- Chain 1. Single crochet 1 (mark the first stitch).
- Work 10 groups: [1 Single Crochet (sc) + 1 Single Crochet Increase].
- Sl st to join and chain 1.
- Round 4:
- Chain 1. Single crochet 2, then decrease 1.
- Single crochet 4, then repeat [sc 1, chain 2] 14 groups around.
- End with sc 4, sc decrease, sc 2. Sl st to close and cut yarn.

Repeat to make 3 large petals.

Step 3: Kaix (Green Base)
- Foundation (Magic Ring): Work 5 Single Crochets (sc) into the ring. Pull tight and sl st to join.
- Round 2: Work 5 single crochet increases (total 10 stitches). Sl st to join.
- Round 3: Single crochet 1, then increase 1 - repeat 5 groups (total 15 stitches). Sl st to join.
- Round 4: Single crochet 15 without increasing. Sl st to join.
- Round 5:
- Chain 9. In the second chain from the hook, work: (Slip Stitch 2, Single Crochet 2, Half Double Crochet 2, Double Crochet 2).
- Skip 2 stitches and sl st into the third stitch. Repeat 5 times to create leaves around the kaix.
- Finish by sl st to first stitch and cut yarn. Weave ends.

Step 4: Leaves
- Foundation: Chain 12. Add wire after first single crochet for shaping.
- Row 1:
- In the 2nd chain from hook: Single Crochet 1, Half Double Crochet 1, Double Crochet 1.
- Treble Crochet 4, followed by Double Crochet 1, Hdc 1, Sc 1.
- In the last chain: Work 3 Single Crochets to create a rounded tip.
- Row 2 (Symmetrical Crochet):
- Work in reverse order along the other side of the chain (sc, hdc, dc, tr4, dc, hdc, sc).
- At the base, sl st to join, chain 1, and start decorative edging.
- Edging: Work [sc 1, ch 2] ten groups along each side. Add a Pico Stitch at the tip of the leaf.
Repeat to make 2 leaves. Wrap excess yarn into the wire at the base, twist, and cut.
Step 5: Assembly
- Prepare the Stem: Bend the top of the flower stem slightly.
- Attach Small Petals: Arrange the two small petals around the stem. Glue one side and fold the other over the flower stem.
- Add Large Petals: Layer each petal around the stem:
- First petal: Glue only one side for flexibility.
- Second and third petals: Glue both sides fully and position to overlap the previous layers.
- Attach Kaix: Apply glue to the kaix and the stem. Slide the kaix to the bottom of the petals. Wrap it tightly with green yarn.
- Add Leaves: Attach and wrap the leaves securely onto the stem with yarn or wire.
Final Touches
- Wrapping the Stem: Wrap green yarn or floral tape around the stem for a uniform finish, adding glue for durability.
- Trim and Tidy: Clean up loose ends or glue for a polished finish.
Final Words
You've now completed a beautiful, realistic mini rose! This miniature flower is perfect for bouquets, hair accessories, or home decor. For larger projects, increase the petal count or size scale to create fuller flowers.
Tips:
- Use high-quality yarn for a smooth texture.
- Avoid too much glue while assembling-it may stiffen the petals.
- For added realism, experiment with gradient yarns or color-changing options.