
Keeping your essentials organized becomes effortless with a crochet card holder pattern that combines style and practicality in one compact piece. Perfect for storing credit cards, IDs, or business cards, it fits easily into any pocket or bag, making it ideal for errands, travel, or minimalist everyday use.

Crocheted with vibrant yarn for a bold look or muted tones for an elegant touch, it allows endless customization to suit your personal taste. This small but functional accessory not only reduces clutter but also adds a handmade charm to your routine.
Pair it with a matching crochet tote or wallet for a coordinated set, and enjoy the satisfaction of creating something both beautiful and useful for yourself or as a thoughtful gift.
Materials Required
- Crochet Hook: 3.0mm
- Yarn: 5-ply cotton yarn (Durable and flexible enough for structured designs).
- Scissors: For cutting yarn cleanly after fastening.
- Yarn Needle: For weaving in ends neatly.
Gauge
- 4 single crochets (sc) = 1 inch in 5-ply cotton yarn using a 3.0mm hook.
- Gauge is important for this project to ensure the final sized card holder fits standard cards. Adjust hook size slightly if necessary.
Finished Size
Approximately 9cm (3.5 inches) wide and 6cm (2.5 inches) tall, depending on the gauge and tension. This size comfortably holds credit cards, membership cards, and other small items.
Tips for Crocheting Success
- Work in Back Loop Only: Follow instructions carefully to create the textured effect.
- Consistent Tension: Ensure your tension is even throughout the project for a neat and durable design.
- Yarn Changes: For customization, change yarn colors when appropriate (e.g., between outer edges and decorative details).
Crochet Card Holder Pattern
This crochet pattern will guide you step-by-step to create a stylish, textured card holder using simple stitches combined with unique techniques. The project is designed to be functional and personalized but also delightful to crochet. It can hold cards, small items, or even function as a lightweight wallet.
Base Foundation
- Chain 26: Begin by chaining 26 stitches. This forms the base foundation for the card holder.
- Work Single Crochet (sc) Across the Chain:
- Starting from the second chain, work 24 single crochets (sc).
- In the last chain, work 3 single crochets (3sc) to create the rounded edge.

- Continue on the Opposite Side:
- Work 23 single crochets (sc) on the opposite side of the foundation chain.
- In the final chain, make 2 single crochets (2sc) to complete the round.
- Join the Round:
- Slip stitch into the first stitch to close the round.
Round 2: Textured Base
- Chain 1: Start with 1 chain stitch.
- Work 52 Single Crochets (sc) in Back Loop Only:
- Crochet one single crochet into the back loop of each stitch around.
- This creates the raised textured lines.
- Slip Stitch: Once you've made 52 single crochets, slip stitch into the first stitch to join.

Round 3: Alternating Stitches for Texture
- Chain 1: Start with 1 chain.
- Begin Alternating Stitches:
- 1 Single Crochet in Back Loop Only: Work one single crochet in the back loop of the first stitch.
- 1 Single Crochet Under the Next Stitch: Insert your hook under the next stitch (around the post of the stitch) and make a single crochet.
- Repeat the Sequence: Alternate between "back loop single crochet" and "under the stitch single crochet" around the row.
- Slip Stitch: After completing the round, slip stitch into the first stitch to join.
Round 4: Simplified Alternating Stitches
- Chain 1: Start the round with 1 chain.
- Alternate Stitches:
- 1 Single Crochet Under the First Stitch: Insert your hook under the first stitch and make a single crochet.
- 1 Single Crochet in the Next Stitch (back loop): Work one single crochet in the back loop of the next stitch.
- Repeat: Continue alternating the stitch styles around.
- Slip Stitch: Slip stitch into the first stitch to join, chain 1, and cut the yarn.

Work the Card Holder Flap
- Rejoin Yarn: Attach the yarn to the desired corner of the card holder.
- Chain 1 and Work Single Crochet Rows:
- Work single crochet (sc) evenly across the edge.
- Chain 1 at the end of each row and turn back to ensure the flap is rectangular.
- Repeat for Several Rows Until the Flap is 5-6cm Long:
- Crochet until the flap covers the top opening of the card holder.
- Fasten and Cut Yarn: Once completed, fasten off and neatly weave in the ends with a yarn needle.
Decorative Edging
- Rejoin Yarn at the Base Edge.
- Chain 1.
- Work 4 Double Crochets (4dc) into the next stitch. This creates an ornamental puffed look.
- Slip Stitch into the Next Stitch.
- Repeat: Continue the sequence (4dc, 1slst) across the desired edge.
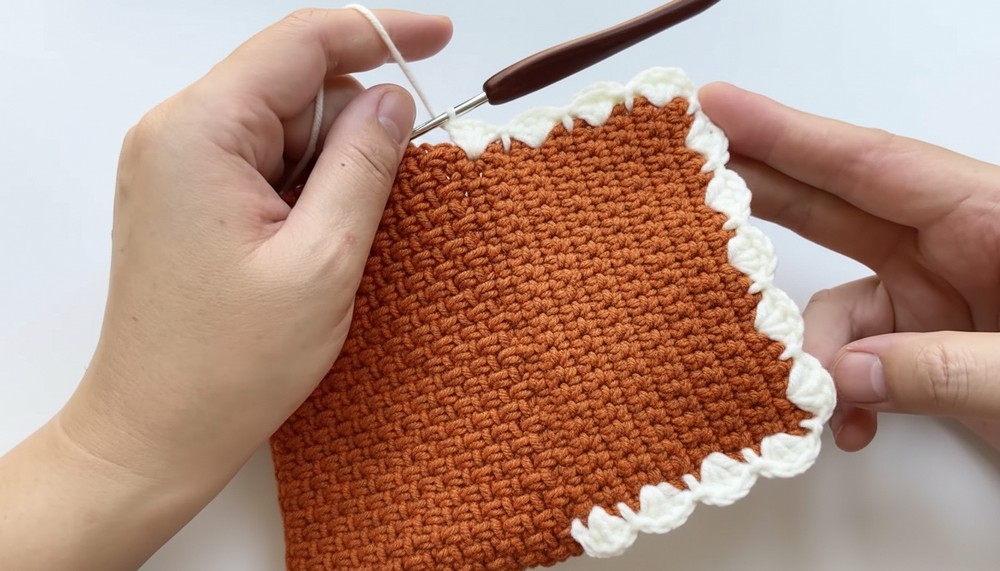
- To Add Gaps: Skip one stitch occasionally, as follows:
- Chain 1, Skip 1 Stitch, Work 4 Double Crochets, Skip 1 Stitch, Slip Stitch.
- Finish with Slip Stitch and Cut Yarn: Once you've completed the decorative edge, slip stitch into the last stitch, leave a long tail, and fasten securely.

Assembly
- Fold the Edges: Fold the card holder so that the sides meet evenly.
- Sew Edges: Use the long tail to stitch along the sides of the holder for secure assembly. Leave the top flap free for opening and closing.
- Use a yarn needle to weave in ends for a clean finish.

Tips for Customization
- Color Changes: Use different colors for the base, flap, and decorative edging for added visual interest.
- Button Addition: Sew a small button onto the flap, and make a buttonhole using chain stitches.
- Pattern Play: Add stripes, embroidery, or embellishments with contrasting yarn.
Conclusion
The Crochet Card Holder is a beautiful and functional project featuring textured stitches and a decorative edge. It is beginner-friendly yet provides opportunities for intermediate crocheters to experiment with personalization and advanced techniques.
Important Remarks
- Secure Fastening: Ensure all edges and decorative stitches are tightly secured for durability.
- Neatness Counts: Weave in ends carefully and block the finished piece gently if necessary to shape it perfectly.
- Versatility: This card holder can be scaled up for passports, gadgets, or other items by increasing foundation chains.
Optional Add-Ons
- Lining: Add a fabric lining for a professional, polished interior.
- Zip Closure: Attach a small zipper to the top edge for added security.
- Gift Wrapping: Perfect for gifting-wrap it with ribbon or include additional designs.