One sunny afternoon, I wanted to create something special for my niece who loves fun and colorful hair accessories. While looking for ideas, I came across a Free Crochet Grape Hairclip Pattern. It looked so cute and different, I knew she would love it. With just some leftover yarn in purple and green, I started crocheting small round grapes and tiny leaves. In no time, I had a bunch of soft, tiny grapes that looked just like a real bunch you'd find on a vine.
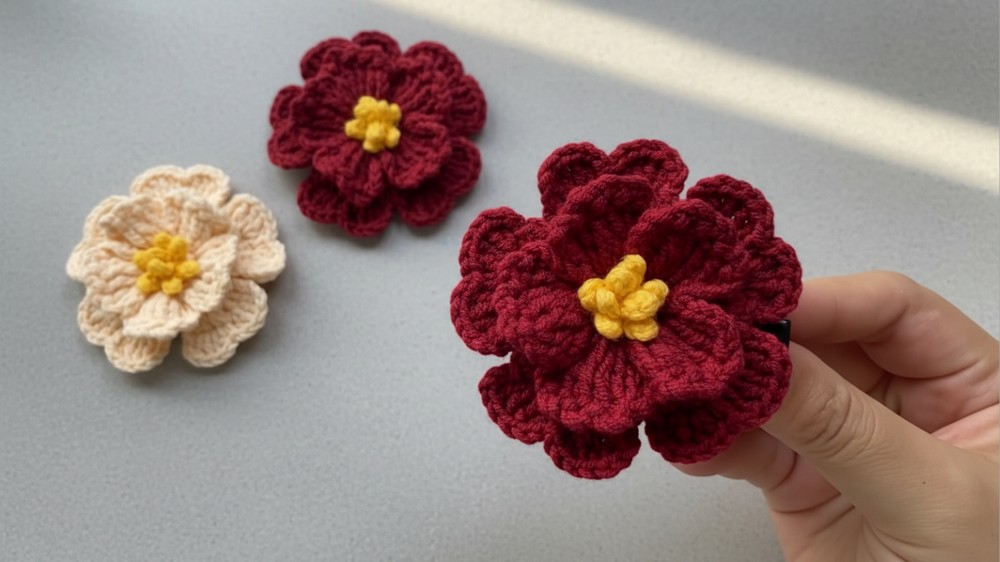
Vibrant Crochet Flower Hairclip Free Pattern
The beauty of this crochet grape hairclip lies in its playful design. The little grapes are puffy and round, making the hairclip look lively and fresh. The texture is soft but bumpy, just like real grapes. Bright green leaves on top make the bunch look even more real and eye-catching. You can make the grapes purple, green, or any color you like, which makes each hairclip unique and fun.

This hairclip isn't just pretty, it's really useful. You can wear it to keep your hair neat at school, at parties, or just for a cheerful everyday look. It also makes a perfect gift for children, friends, or anyone who enjoys wearing cute accessories.
Best of all, this pattern can be made by anyone, even if you're new to crochet. It's a fast project that uses only a small amount of yarn, so it's great for using up what you already have. Crocheting a grape hairclip is a joyful way to show creativity and bring a smile to someone's face with your handmade touch.
Materials
- Yarn: 4-ply cotton yarn in two colors:
- Wine Red (for the petals).
- Mustard (for accents and trim).
- Crochet Hook: 2.5mm.
- Hairclip Base: Snap clips, barrette clips, or alligator clips.
- Tapestry Needle: For weaving in ends and sewing the flower to the clip.
- Scissors: To cut yarn.
Gauge
Gauge is not critical for this pattern, as it is a decorative piece. However, even tension ensures uniform petals and a polished look. If your flower is too loose, adjust your hook size accordingly.
Finished Size
The finished flower will measure approximately 6-7 cm in diameter, depending on your yarn and tension.
Crochet Flower Hairclip Pattern
This Crochet Flower Hairclip features intricate layered petals and elegant details, perfect for hair accessory enthusiasts. This pattern guides you step-by-step in creating a multi-layered flower that can be used as a hairclip, brooch, or decorative accessory.
Step 1: Central Circle (Wine Red)
- Start with a slip knot and create a magic ring.
- Round 1 (R1): Work 5 single crochets (sc) into the ring.
- Pull the yarn tail tight to close the loop.
- Slip stitch (slst) into the first stitch to close the round.
- Chain 1.

Step 2: Second Round (Wine Red)
- Round 2 (R2): Work 1 increase in each stitch around (2 sc in each stitch): (inc × 5 = 10 sc).
- Total stitches at the end of this round: 10 sc.
- Slip stitch into the first stitch to close the round.
Step 3: First Layer of Petals (Wine Red)
- Switch to working in front loops only (FLO) for the petals.
- For Each Petal:
- Chain 4.
- Work 2 treble crochet (tr) in the first stitch.
- Work 2 treble crochet (tr) in the next stitch.

- Chain 4, then slip stitch (slst) in the same stitch.
- Repeat 4ch + 2tr + 2tr + 4ch + slst in FLO for the remaining 4 clusters to make 5 petals total.
- Once all 5 petals are complete, slip stitch into the base to secure.
Step 4: Add Curved Edge Details (Wine Red)
- Chain 5, then slip stitch in the same stitch to form a curve.
- Work the following for each petal:
- (Chain 3, slip stitch into the petal edge) × 3.
- Chain 5, and slip stitch into the next petal.

- Repeat for all petals.
- Complete all detailing with a slip stitch.

Step 5: Back Layer Base (Wine Red)
- Switch to working in back loops only (BLO) from the original stitches at the base.
- Back Layer (BLO Round):
- (sc, inc) × 5 = 15 sc into the BLO.
- Slip stitch to close the round.

Step 6: Second Layer of Petals (Mustard)
- For Each Petal:
- Chain 4.
- In the same stitch, work 2 treble crochet (tr), then 1 double treble crochet (dtr) in the next stitch.
- Work 2 treble crochet (tr) in the next stitch.
- Chain 4, and slip stitch in the same stitch.
- Repeat 4ch + 2tr + dtr + 2tr + 4ch + slst for all 5 petals in this layer.
- Complete with a slip stitch in the base.
Step 7: Decorative Edge Details (Wine Red)
- Work an edging row:
- Chain 3, and slip stitch into the 4th chain of the next petal.
- Chain 2, work 2 double crochets (dc) in the next 2 stitches.
- Chain 1, work 1 single crochet (sc), chain 1, then work 2 double crochets (dc) in the next 2 stitches.
- Chain 2, and slip stitch.
- Repeat this detailed sequence for each petal.
Step 8: Final Spiral Design (Mustard)
- For the final accent details:
- Chain 3, and slip stitch into the 2nd and 3rd chain from the hook.
- Repeat: Chain 3, slip stitch into 2nd and 3rd chain for 8 accents total.
- Fasten off the yarn and cut, leaving a long tail for sewing.
Assembly
- Securely attach the flower to the hairclip base by sewing it in place with a tapestry needle.
- Sew through the back of the flower and loop around the top part of the clip for sturdiness.
- Ensure the clip is evenly positioned for optimal balance.
- Weave any yarn ends into the stitches for a clean and tidy finish.
Customization Ideas
- Bold Color Combinations: Switch up the colors! Use similar tones like blush pink and gold for a soft, romantic look or contrasting jewel tones like dark green and ruby.
- Add Beads/Pearls: Place a bead or small pearl in the flower's center for added elegance.
- Increase or Decrease Layering: Add a third layer of petals (smaller in size) for more volume or keep it as a single or double-layer flower for simplicity.
- Leaf Details: Crochet small leaves (using green yarn) and attach them behind the petals for a natural look.
Special Techniques
- Magic Ring: A seamless way to start the flower's center.
- Front and Back Loop Stitches (FLO/BLO): Allows creating layered designs by working into specific loops.
- Treble and Double Treble Crochet: Adds height to the petals, giving them a delicate, dimensional look.
- Chains for Spiral Decorations: These final details give the flower its polished, intricate appearance.
Conclusion & Remarks
Your finished Crochet Layered Flower Hairclip in Wine Red and Mustard is an elegant, textured piece with vibrant layered petals and intricate details! This versatile flower works well as a hairclip, brooch, or even as embellishments for clothes, bags, or home decorations. Its design combines beautiful high-layered petals, intricate detailing, and a polished back for seamless use.