
Achieve flawless results easily with this free crochet no-sew stingray amigurumi pattern that's fun, trendy, and beginner-friendly.
Crocheting doesn't get much more fun and stress-free than this adorable no-sew stingray amigurumi pattern! Designed for beginners or anyone looking for a quick and satisfying project, this pattern creates a squishy, ocean-inspired friend that can double as a toy, decoration, or thoughtful handmade gift. The best part is that no tedious sewing is involved-just clever crocheting techniques that bring the Stingray to life with ease. Made with single crochet stitches, increases, and chains, this project highlights the basics of amigurumi, making it a great choice for practicing or even experimenting with other crochet designs like whales, jellyfish, or flat ornaments.
What You Will Learn
From this pattern, you'll master single crochet techniques, working in rows, making clean increases, and joining flat panels seamlessly using crochet stitches. Beyond creating this stingray, these skills can be applied to other beginner projects, like wallets, flat animal shapes, or even keychains. The process of attaching safety eyes and crocheting the tail will also help you perfect details for future amigurumi projects.
Cozy Up Your Collection with This Free Crochet No Sew Stingray Amigurumi Pattern

This pattern uses super bulky yarn (though you can adapt it to other weights) to give the stingray a soft and plushy feel. You can mix and match colors for a unique look or even recreate it in pastel tones for playful vibes. Safety eyes are added for a sweet personality, and there's room for customization-a small smile or decorative dots can enhance its charm even further. One of its standout features is its flat design, perfect for snuggling but not overstuffed, making it lightweight and simple.
Highlights of the Pattern
Here's why this pattern is worth your time:
- Suitable for beginners.
- No sewing required-perfect for those who find traditional amigurumi intimidating.
- Learn versatile skills like increasing and joining layers with single crochet stitches.
- Customize with colors, expressions, or added embellishments like embroidery.
- The finished product is cute, cuddly, and perfect as a creative gift!
This no-sew stingray pattern is straightforward, practical, and guaranteed to bring a smile!

No-Sew Crochet Stingray Amigurumi Pattern
This beginner-friendly no-sew amigurumi Stingray pattern is designed to be simple, fast, and fun! Ideal for enthusiasts who dislike sewing, this project keeps assembly minimal and ensures a delightful result with just a few tools and techniques.
The no-sew crochet stingray pattern is a perfect quick project for beginners and anyone looking to add a playful ocean critter to their amigurumi collection. With simple, repetitive stitches and easy assembly, you'll have this soft and squishy Stingray whipped up in no time!
Skill Level & Terminology
- Skill Level: Beginner
- Terminology: US Crochet Terms
Materials & Tools Required
- Yarn: Super bulky yarn (e.g., Alize Voluto or any plush yarn) in two colors for top and belly portions. Suggested: Blue and white.
- Hook: 7 mm crochet hook (feel free to size down for tighter stitches).
- Safety Eyes: Two 10 mm safety eyes.
- Stuffing: Polyfill, fiberfill, or yarn scraps.
- Additional Tools: Pair of scissors and a yarn needle.
Gauge
Gauge isn't critical for this pattern-your Stingray will depend on yarn type and hook size. A tighter stitch is recommended for amigurumi to prevent stuffing from showing through.
Abbreviations List
- ch: Chain
- sc: Single Crochet
- inc: Increase (2 sc in the same stitch)
- st(s): Stitch(es)
- sl st: Slip Stitch
Finished Size
- Using super bulky yarn and a 7 mm hook, the finished Stingray measures approximately 5-6 inches wide from head to tail.
Special Stitch Instructions
No special stitches are required beyond the basics! You'll be working single crochets, increases, and chains throughout this pattern.
The Pattern
Top and Bottom Parts of the Stingray
You'll crochet two identical pieces, one for the top and one for the bottom.
Step 1: Base Shape
- Row 1: Ch 4

- Row 2: Skip the first ch. Into the second st, make 1 sc, into the next st make 2 sc (inc), into the last st make 1 sc. (4 sts)
- Row 3: Ch 1, turn. Inc (2 sc in 1 st) into each st across. (8 sts)
- Row 4: Ch 1, turn. Inc in first st, 1 sc into the next 6 sts, inc in last st. (10 sts)
- Row 5: Ch 1, turn. Inc in first st, 1 sc into next 8 sts, inc in last st. (12 sts)
- Row 6: Ch 1, turn. Inc in first st, 1 sc into next 10 sts, inc in last st. (14 sts)
- Row 7: Ch 1, turn. Inc in first st, 1 sc into next 12 sts, inc in last st. (16 sts)
- Row 8: Ch 1, turn. Inc in first st, 1 sc into next 14 sts, inc in last st. (18 sts)
- Row 9: Ch 1, turn. 1 sc into each st across (no increases). (18 sts)
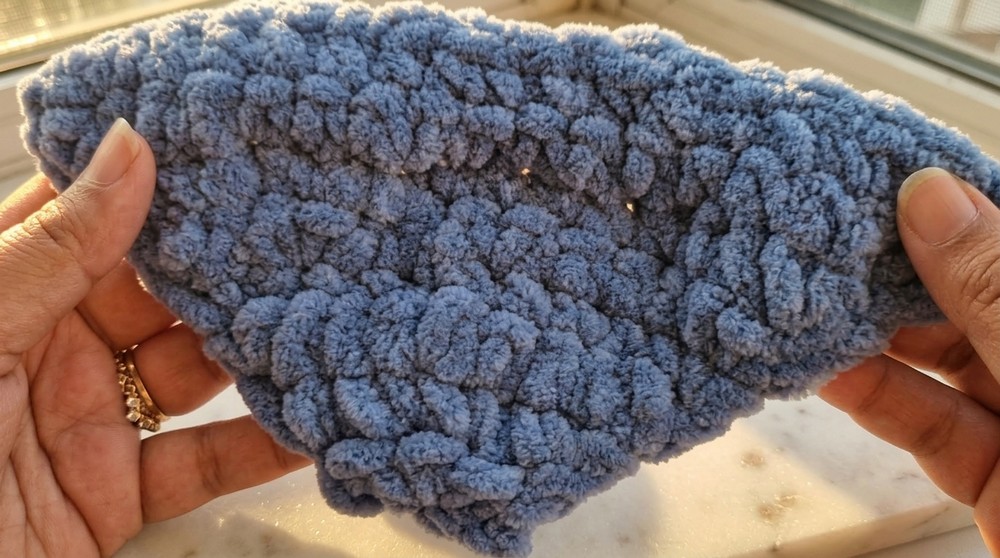
Once finished, fasten off and weave in ends. Repeat these steps to create the second identical piece for the bottom.
Front Head Section
Here's how to make the Stingray's head. Use one of the two completed bases.
- Find the middle stitches by dividing the row of 18 sts into three equal sections (6, 6, 6).
- Reattach yarn at the 7th stitch.
- Do 6 sc across. (6 sts)
- Ch 1, turn work. Do 6 sc back across. (6 sts)
- Fasten off but do not weave in ends. Keep this aside.
Quick Tip: This head section may seem small but adds personality. If this step confuses you, try visually dividing the stitches to locate the middle section. Meet me after repeating the steps for the belly piece!
Assembly
- Place the top (blue) and bottom (white) pieces together, aligning stitches carefully. Use your yarn and hook to attach them.
- Starting at the edge of the head section, insert hook and make 1 sc into each pair of corresponding stitches from the blue and white layers.

- Continue crocheting around both pieces. Leave a small opening at the back for stuffing.
- Add your safety eyes to the top piece, positioning them on the row of 6 stitches (far left and far right) before closing the shape completely.
- Lightly stuff the Stingray, keeping it slightly flat for the right look. Once stuffed, finish closing tightly with single crochets.
When done, fasten off and weave in ends. Make sure any finishing touches blend colors to avoid showing them on opposite sides.
Tail Section
- Attach blue yarn to the tail base (bottom-center edge).
- Ch 8 to create the tail base.
- Skip the first chain and make 1 sc in each remaining chain. (7 sts)
- Sl st into the body base to attach the tail.
- Fasten off and weave in ends.
For added durability, ensure stitches are tight and the tail is neat.
Making the tail gives the Stingray its unique look! Don't skip reinforcing this area with neat stitches for a polished appearance.
Finishing Touches
- Attach accents if desired. You can embroider a small smile or add decorative stitches to the top of the Stingray for customization.
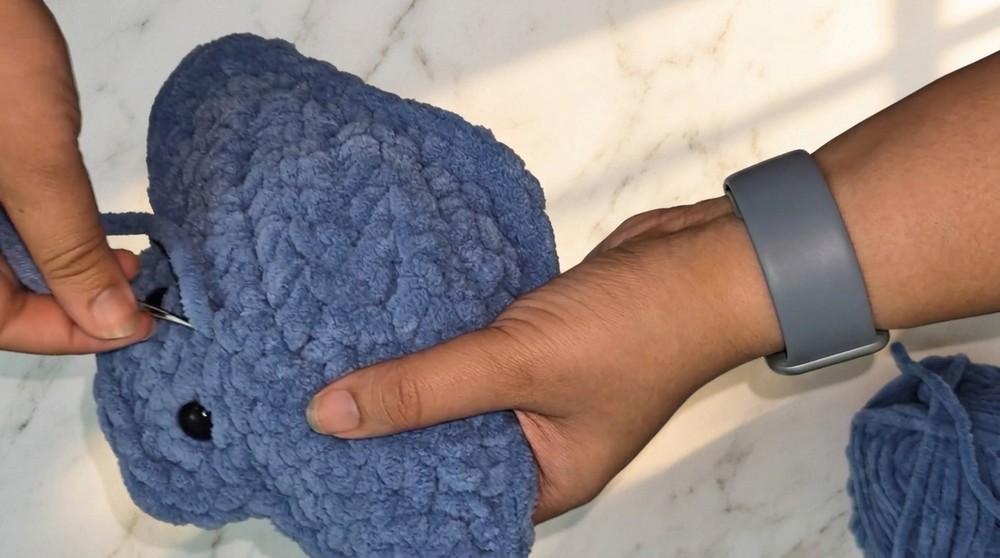
- Make sure all ends are tucked neatly (blue through blue, white through white).
The pattern is complete! Your Stingray is now ready for use or gifting.
Common Challenges & Quick Fixes
- Bulky yarn visibility: Thick yarn can feel tricky for beginners. Solution: Use stitch markers or touch the stitches to "feel" your way through rows.
- Aligning pieces properly: Misalignment during assembly may happen. Focus on matching stitches carefully and keep the layers flat to ensure neat edges.
Notes on Starting and Pattern Stitches
You begin this pattern with repetitive increases, single crochets, and chains. These stitches simplify shaping, making it beginner-friendly. The no-sew technique used for assembly eliminates the need for complex stitching and hand sewing, ensuring more crocheters can enjoy this fun, whimsical amigurumi project with minimal frustration.