
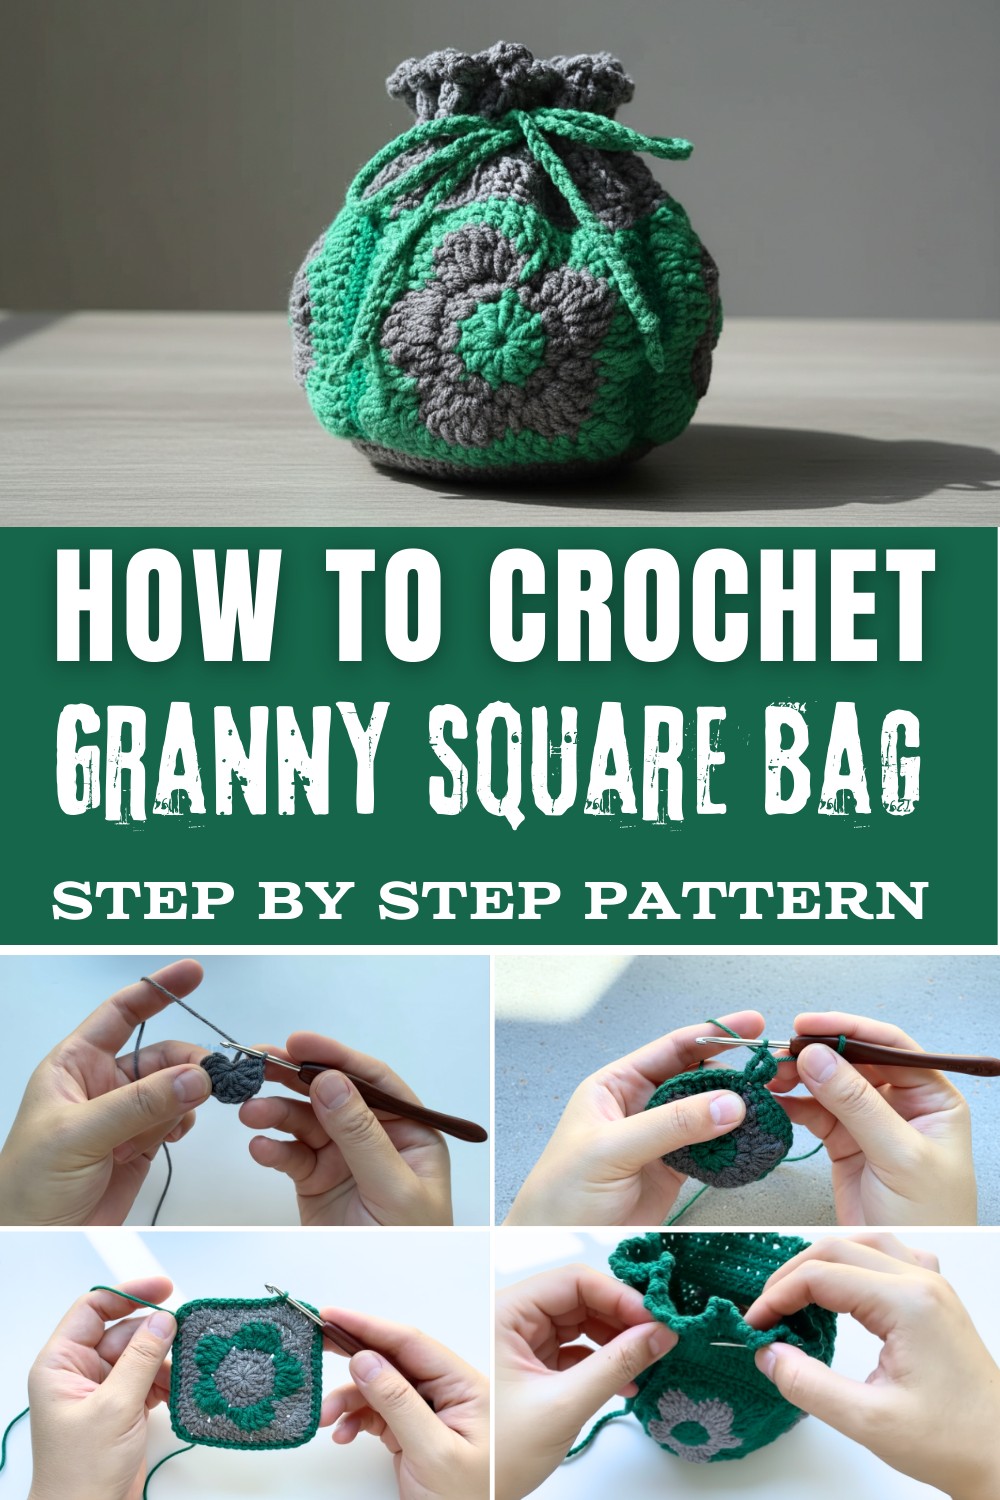
Do you want to create something colorful and useful with your own hands? The Free Crochet Granny Square Bag Pattern is a fun and friendly project that anyone can enjoy, even kids. A granny square bag is made from small, bright squares called granny squares. Each one is like a tiny blanket, stitched together to make a pretty bag. These squares are full of fun colors, you can use your favorite shades like blue, yellow, pink, or even mix all the rainbow colors together. This bag is cheerful and full of charm, just like a patchwork quilt you can carry.
This pattern lets you use your bag in so many exciting ways. You can turn your squares into a fashion bag, a handy book tote, a cute gift pouch, or even a special lunch bag. If you want your bag big enough for shopping, just crochet more squares. For a small pouch for treasures, make just a few.
Bright Crochet Granny Square Bag Pattern
Crocheting this bag is easy. All you need is a 3.5mm hook and some soft cotton yarn. The star of this project is the granny square stitch, which uses double crochet stitches to build each square. After you connect the squares, the bag is usually about ten inches wide and ten inches tall, but you can make it any size you wish by adding more or fewer squares.
From this pattern, you can also make a coin purse, a pencil case, or even a colorful pillow cover. The granny square bag is simple, lovely, and always one of a kind-just like you! Crocheting these squares is a joyful journey, and soon you'll have a bag that stands out anywhere you go.
Materials Needed:
- Yarn: 4-ply cotton yarn (variegated or solid colors depending on your preference)
- Hook: 3.0 mm crochet hook
- Scissors
- Tapestry needle
- Stitch markers (optional, to keep track of sections)
Gauge:
- Gauge Measurement: 10 double crochets in a round measure approximately 1.5 inches across.
Finished Size:
The final size depends on the number of rounds you work on and the tension of your stitches. With the steps provided, the finished project is approximately 5-7 inches in diameter, suitable as a decorative centerpiece or coaster.
Special Techniques Used:
- Invisible Slip Stitch: Helps to seamlessly finish off the piece.
- Yarn Color Changes: Used for creating distinct sections in the pattern.
- Treble Crochet Cluster: Adds texture and depth to the design for visual interest.
Tips for Success:
- Ensure even tension while crocheting to maintain a consistent shape.
- Test your gauge before starting the pattern.
- Change yarn colors carefully by pulling the new color tightly to eliminate gaps.
- Follow stitch counts closely to keep the circular shape intact.
Customization Ideas:
- Add more rounds using similar stitch patterns to create a larger project (e.g., placemats, table doilies).
- Experiment with textured yarn or metallic thread for elegant variations.
- Embellish the edges with beads or tassels.
Step-by-Step Pattern Instructions:
Round 1 (R1): Foundation Circle
- Begin with a slip knot and chain 3.
- Work 10 double crochets (dc) into the ring formed (foundation circle), ensuring even spacing.
- Pull the yarn tail to tighten the loop.
- Slip stitch into the first double crochet to close the round.
- Chain 1 and cut the yarn.

Round 2 (R2): Increasing Circle
- Join a new yarn color and chain 2.
- Work 2 half double crochets (hdc) into each stitch from the previous round. This increases the total number of stitches to 20 hdc.
- Slip stitch into the first half double crochet to close the round.
Round 3 (R3): Textured Cluster
- Chain 1.
- Starting in the next stitch:
- Work 1 double crochet (dc).
- Work 1 treble crochet (tre) in the same stitch.
- In the next stitch:
- Work 3 treble crochet (tre).

- Work 3 treble crochet (tre).
- In the next stitch:
- Work 1 treble crochet (tre) and 1 double crochet (dc).
- Slip stitch into the next stitch to complete the sequence.
- Repeat the segment: (1dc, 1tre), (3tre), (1tre, 1dc), slst around the circle.
- Slip stitch into the initial stitch, chain 1, and cut the yarn.
Round 4 (R4): Shaped Edge
- Join a new yarn color and chain 1.
- In the same stitch, work 1 single crochet (sc).
- In the next stitch, work 1 half double crochet (hdc).
- Work 1 double crochet (dc) into the following 2 stitches.
- Work 1 treble crochet (tre) in the next stitch.
- Then, work 1 double crochet (dc) into the next 2 stitches.

- Work 1 half double crochet (hdc) into the next stitch.
- Finish with 1 single crochet (sc) into the next stitch.
- Repeat the sequence 1hdc, 2dc, 1tre, 2dc, 1hdc, 1sc around the circle.
- Slip stitch to join the round.

Round 5 (R5): Defined Corner Details
- Chain 3.
- Work 2 treble crochet (tre) into the same stitch.
- In the next stitch, work 2 double crochet (dc).
- Work 1 double crochet (dc) into the next stitch.
- Work 1 half double crochet (hdc) into the next stitch.
- Work 1 single crochet (sc) into the next 3 stitches.
- Work 1 half double crochet (hdc), followed by 1 double crochet (dc).
- In the next stitch, work 2 double crochets (dc).
- Work 3 treble crochet (tre) in the next stitch.
- Repeat the sequence 2dc, 1dc, 1hdc, 3sc, 1hdc, 1dc, 2dc, 3tre around the circle. Slip stitch to join.

Round 6 (R6): Final Scalloped Border
- Join new yarn with a slip stitch and chain 1.
- Begin with 1 single crochet (sc) in the same stitch.
- Work 3 single crochet (sc) into the next stitch to form a corner.
- Work 1 single crochet (sc) into each stitch until you reach the next corner.
- At the corner, work 3 single crochet (sc).
- Repeat this pattern for the round.
- Slip stitch to finish off, chain 1, and cut the yarn.
- Use invisible slip stitch techniques to secure your yarn ends neatly.
Optional Border Enhancement (Round 7): Decorative Edge
- Single crochet around the edge.
- Slip stitch to join, chain 3, and work double crochet (dc) in each stitch around.
- At each corner, increase by working dc-inc ×2.
- Slip stitch into the first stitch and fasten off.

Optional Finishing Touch (Round 8): Picot Border
- Chain 1, work a single crochet (sc) in the same stitch.
- Chain 3, then work 1 single crochet (sc) into the next stitch.
- Repeat the pattern 3ch, 1sc around the edge.
- Slip stitch, fasten off, and weave in the ends.
Conclusion and Remarks:
The finished crochet piece features textured sections, scalloped edges, and a beautiful play of colors. This versatile design can be used as a decorative centerpiece, coaster, or expanded into larger items like placemats, rugs, or doilies.
Important Notes:
- Blocking might be necessary to shape the piece evenly.
- The invisible slip stitch technique ensures the final piece looks polished and neat.
- Feel free to adjust the pattern by adding rounds or testing different yarn combinations for your unique creation.