
Hook up some cuteness with this Free Crochet Mini Owl Keychain Amigurumi Pattern, a quick and fun project that's perfect for adding charm to your everyday accessories.
A tiny round owl with big shiny eyes and soft wings can be yours with the Free Crochet Mini Owl Keychain Amigurumi Pattern. This small friend can travel in your pocket, dangle from a backpack, or stay close to your keys as a cute keychain. Every owl has a loop on top, so it hangs anywhere you like.
Crochet Mini Owl Amigurumi Keychain Free Pattern
Pick any color for your owl, hot pink, pale pink, green, or even rainbow stripes. Each color gives the owl its own style. Some people like to use brown and white for a classic look, while others add pink or purple for something bright. Add tiny yarn tufts or a little beak for even more fun.

With this pattern, it's easy to start your own mini owl group. Share them as party favors, use them as tiny bag tags, or gift one as a special little present. The body and head grow smooth and round, starting with the magic ring stitch. This stitch keeps everything neat and helps the owl look full. Use a 2.0 mm crochet hook and soft cotton yarn for a finish that feels gentle but stays strong.

The mini owl keychain is soft, friendly, and ready for adventure wherever you take it. Each one has a different look with just a switch of yarn colors or a tiny extra detail. With every owl you finish, your collection grows more colorful.

Mini Bito Owl Keychain - Amigurumi Pattern
Welcome to the step-by-step pattern for the adorable Mini Bito Owl Keychain as featured on Elisa Tejidos Perú! This tutorial-style pattern is clearly written and well-suited for intermediate crocheters, with supportive guidance for advanced beginners. It includes specific instructions, helpful comments for pattern reading, and all the key techniques to create this highly requested project.
Skill Level
Intermediate
You should be comfortable with the magic ring, increases, color changes, basic embroidery, and joining small pieces.
Materials & Tools
- Yarn: 2 colors/weights of mercerized cotton or amigurumi yarn
- One dark (e.g., fuchsia or hot pink)
- One light (e.g., pale pink)
- Small amount yellow (beak)
- Hook: Size 2.0-2.5 mm or appropriate for chosen yarn
- Stuffing: Polyester fiberfill
- Safety Eyes: 5 mm, with secure backings
- Felt: White (small scrap for eye whites)
- Embroidery Thread/Needle: Yellow for beak
- Scissors
- Stitch Marker (recommended)
- Glue (for felt, optional)
- Keychain Hardware (for finishing as a keychain)
- Lighter (optional, for melting eye backs)
- Sewing Needle (for wings)
Key Abbreviations
| Abbreviation | Meaning |
|---|---|
| MR | Magic ring |
| ch | Chain |
| sc | Single crochet |
| inc | Increase (2 sc in same stitch) |
| sl st | Slip stitch |
| st(s) | Stitch(es) |
| BLO | Back loops only |
| FO | Fasten off |
Pattern written in US crochet terminology.
Special Notes
- Work in continuous spiral rounds unless otherwise noted.
- Mark the first stitch of each round for accuracy.
- Color changes: Complete the last sc before changing color, pull through new color on the last yarn over.
- Adjust felt/eye positions for character and symmetry.
Finished Size
Approx. 5-6 cm tall when made with listed materials.
Pattern
Owl Body (Bito Main Head/Body Piece)
With main (darker) color:
- R1: MR, 6 sc (6)
- R2: inc in each st around (12)
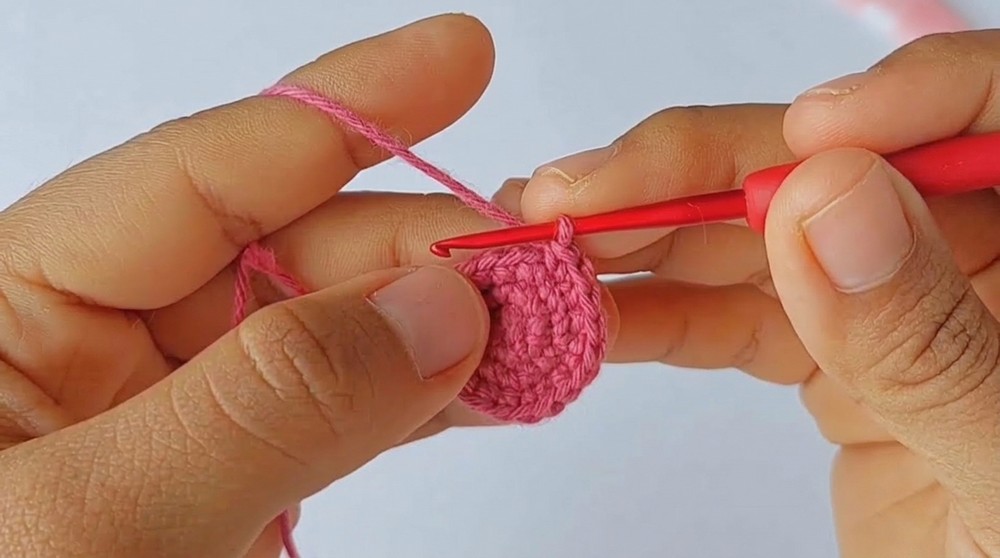
- R3: (sc, inc) x6 (18)
- R4: (sc, inc, sc) x5, sc, inc (24)
- In this round: (sc, inc, sc) sequence 5 times, ending with sc, inc
- R5: (3 sc, inc) x6 (30)
- R6-R11: sc in each st (30)
(6 total rounds of 30 sc)At this stage, you have a neat, rounded base in your main color, forming the lower and middle section of your owl. Use a stitch marker to keep track of rounds.
- R12: Switch to the lighter color yarn. Pull through new color on the last sc of R11.
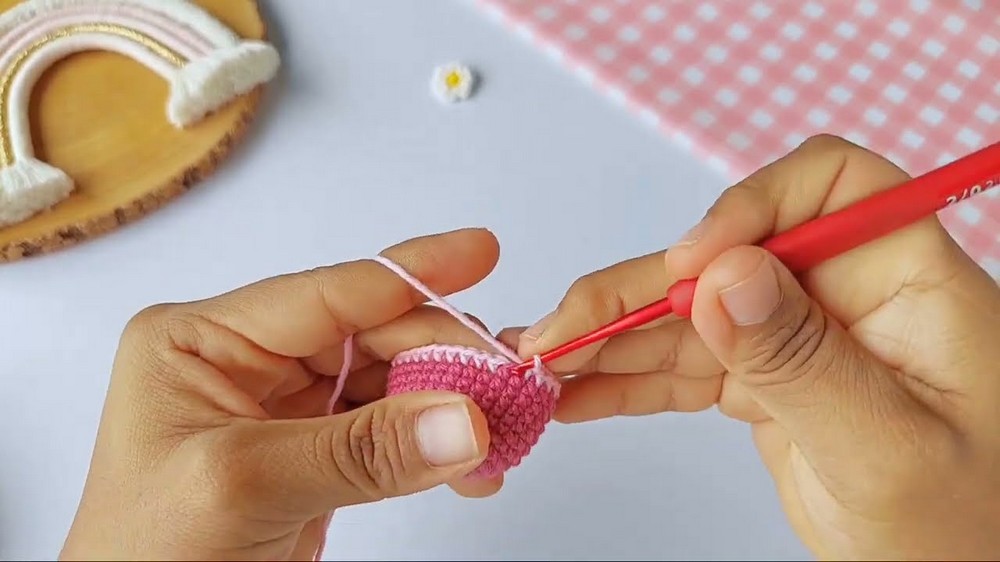
- R12-R16: sc in each st (30)
(5 rounds in new color)Your owl now has a two-tone body with a color change in the middle, giving the characteristic look.
Face/Eye White Felt Base
Instructions (Not crocheted):
- Cut out two identical oval/circle shapes from white felt, making them slightly larger than 5 mm safety eyes.
- These ovals should be prominent enough so that they frame the eyes and are clearly visible when sewn or glued onto the face.
- Test fit on your crocheted body, trim as needed for symmetry.
Cutting even, oval eye-whites gives your Bito the classic cartoon look. Symmetry is key-keep adjusting until both are even in size and shape.
Placing Eyes & Stuffing
- Insert safety eyes through the center of each felt base.
- Place both eyes on the body, centered just above the color change, approximately 5 stitches apart.
- Insert and secure safety backs (test fit before locking-you cannot change placement after).
- Melt or flatten excess plastic on the backs (optional, with caution).
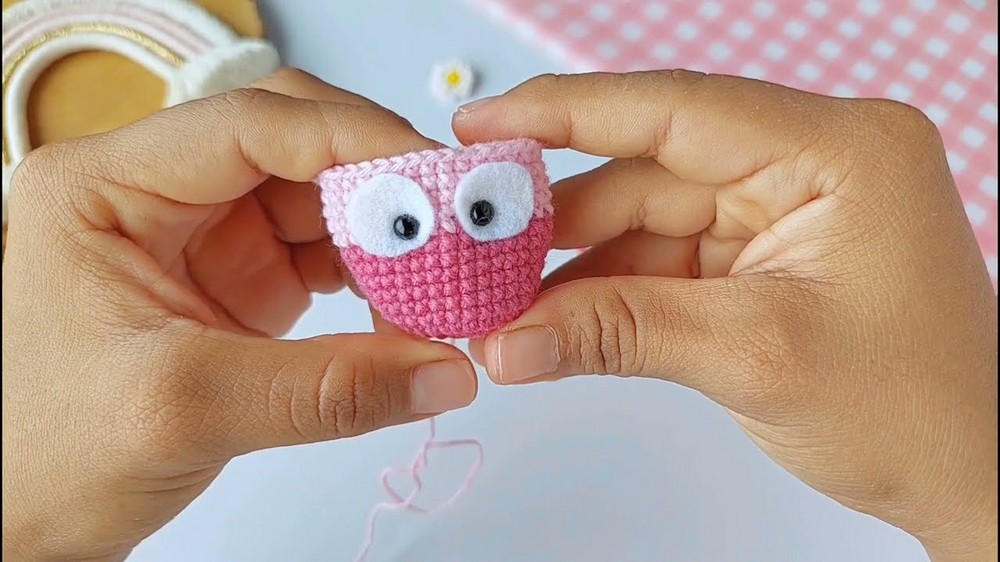
Add stuffing to your Bito, forming a nice rounded shape that's firm but not over-filled.
Closing the Top
- You should have just finished R16 and stuffed your piece.
- Continue with sc for about 8 more sts (or as needed to reach the opposite side for even closure).
- Flatten your piece, matching front to back edges.
- Join front and back edges together: Insert hook through both "front" and "back" stitches across the top, sl st or sc together (about 8-10 sts, as needed to close).
This creates a neat, oval closure and gives the owl its distinctive rounded top. Shape as needed before you fully close the last stitch.
Wings (Make 2)
With main or alternate color:
- R1: MR, 6 sc (6)
- R2: (sc, inc) x3 (9)
- Sl st in next st, FO, leaving a yarn tail for sewing.
You'll have two tiny, slightly domed circles. These will be attached at the color change on each side.
Attaching Wings
- Sew wings onto each side of the body, directly at the color change and about halfway up the side.
- Secure with a few stitches, knot and hide ends inside.
Well-positioned wings add charm and balance-pin first for symmetry if desired.
Beak
With yellow embroidery thread or yarn:
- Place beak between the two eyes, just below the white felt.
- With a tapestry needle, embroider 3 straight (horizontal or diagonal) stitches. Pass below and between the eyes, covering both the color change rounds.
- Tie off inside, hide all ends.
The beak is small but expressive-make sure it's centered and prominent for the classic Bito look.
Finishing and Optional Accessories
- Attach keychain hardware at the top center, sewing or tying securely before weaving in ends, if keychain option is desired.
- Gently shape Bito; glue white felt portions if desired.
- Use leftover yarn strand to tidy or hide edges as needed.
Your Bito keychain is complete and ready for gifting, accessorizing, or selling.
Explanatory Notes
- After crocheting the body, add features (eyes, beak, wings) for optimal positioning-this is helpful for those who don't read patterns fluently.
- Using felt for the eye-whites makes assembly simple and enhances character.
- Test all placements before sewing or gluing permanently for best results.
Conclusion
Congratulations! You have created a charming Mini Bito Owl Keychain using clear amigurumi techniques - perfect as a quick gift, keychain, or cute accessory. This project applies core skills: magic ring, increases, color changes, and neat finishing. Feel free to personalize your Bito with extra details or colors as you wish!
Pattern Corrections & Tips
Corrections:
- Always count stitches after each increase round.
- Adjust felt shapes and eye placement for symmetry.
Tips:
- Use a stitch marker to track rounds.
- Pin features before sewing.
- For flatter wings, block or steam after sewing.
- Use glue sparingly to attach felt; test first to avoid excess.
- Shape Bito as needed with your fingers after closing.