
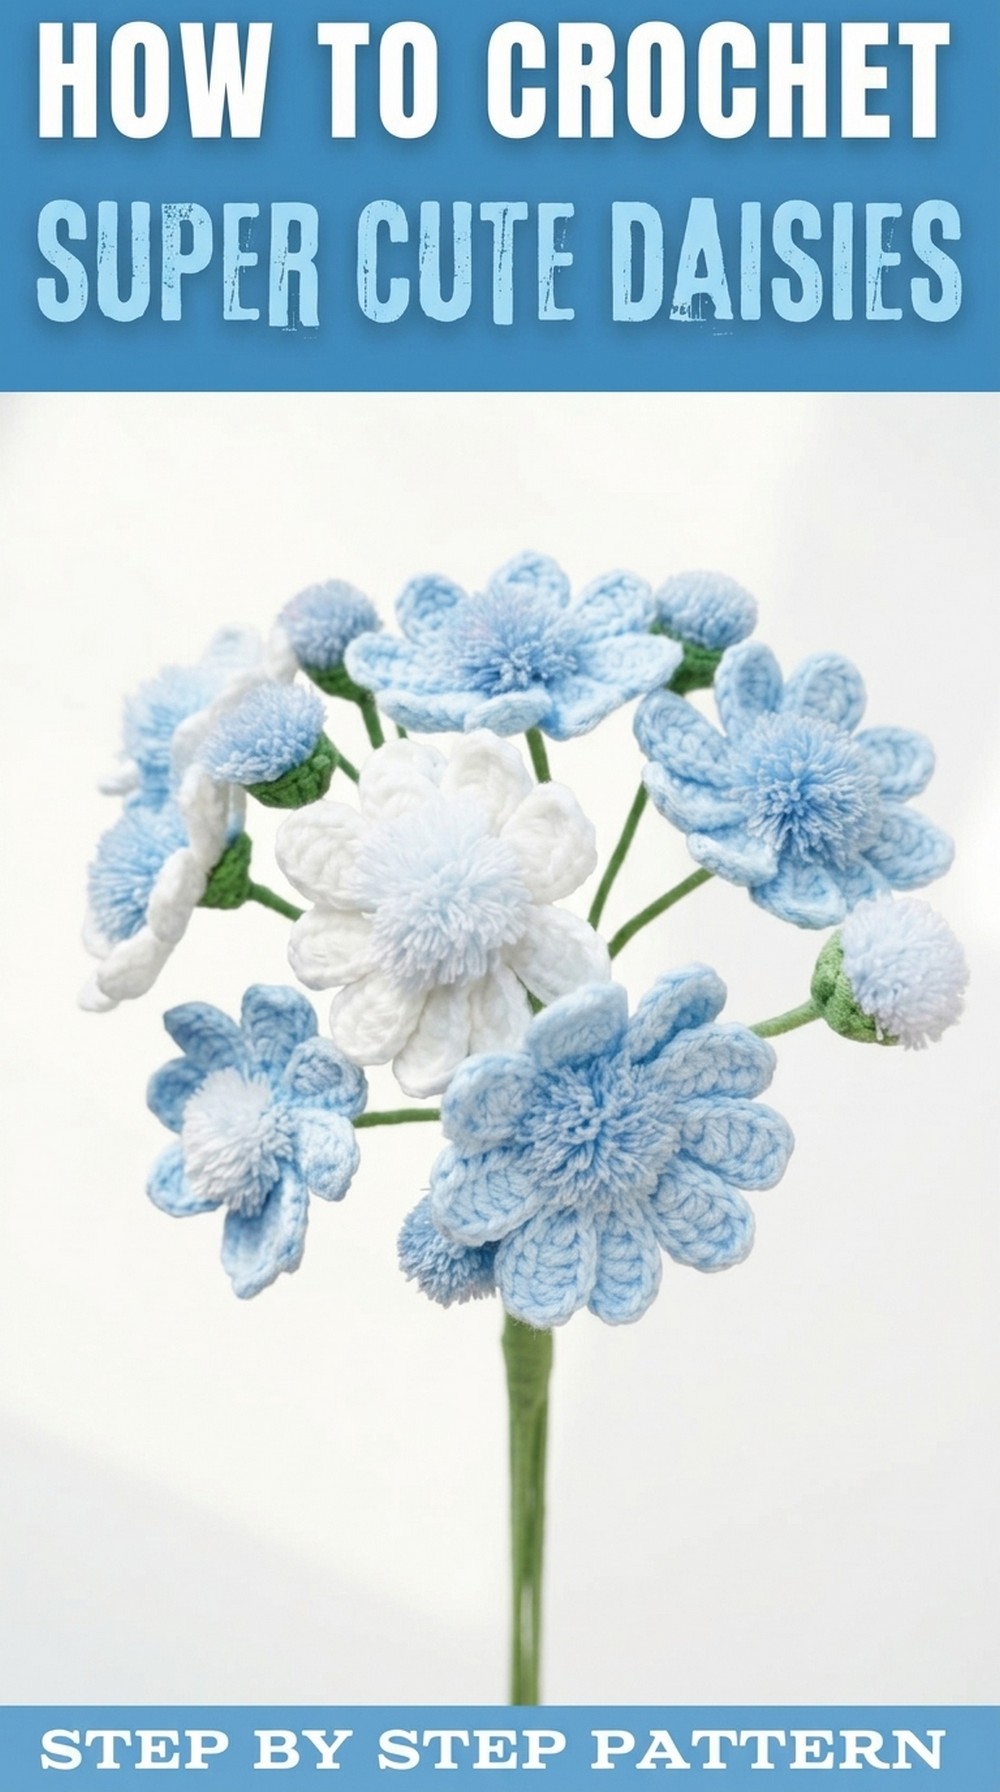
Try the Free Crochet Daisies Pattern for easy steps to crochet cute flowers you can add to gifts or wear in your hair.
Few things brighten up a day like the lasting beauty of daisies, and with this crochet pattern, you can bring that sunshine into your life with your own two hands. Perfectly petite and bursting with charm, these crocheted daisies are super quick to make, taking just about 10 minutes to create each one. Crocheting a garden of dainty flowers in every color imaginable-from the classic white-and-yellow combination to pastel pinks, playful purples, or bold blues. This pattern is particularly beginner-friendly and works beautifully for decorating gift boxes, clothing, or even creating adorable bouquets for your home.
Charming Free Crochet Daisies Pattern for Decorative Keepsake

What sets this crochet daisy pattern apart is its simplicity and versatility. It relies on straightforward techniques like single crochet, double crochet, and half-double crochet stitches, paired with the magic circle method to form the center ring of the flower. These stitches are not only easy to learn but also offer endless possibilities for creating other designs, such as appliqués, crochet coasters, or floral garlands. No wire or glue is needed, so you can focus entirely on your crochet work without additional tools or mess. The playful yarn-wrapped stamen technique adds a textured finishing touch, giving each daisy a realistic, fluffy center.
Creative Ways to Use Your Daisies:
- Gift Tags and Decorations: Add daisies to ribbons and tags for unique gifting.
- Table Décor: Use them as charming table scatter or napkin ring accents.
- Fashion Accessories: Apply daisies to hair clips, handbags, or scarves for instant flair.
- Seasonal Wreaths: Incorporate them into spring or summer wreaths for your front door.
- Bouquets and Garlands: Make entire arrangements for everlasting floral beauty.
With this simple and enjoyable pattern, you'll have endless opportunities to create something beautiful while honing your crochet skills.
Materials Needed
- Yarn:
- Baby Blue-colored 4-ply yarn for the petals.
- Green 4-ply yarn for the leaves, stem, and flower base (cotton recommended for durability).
- Baby Blue or White yarn for the flower pistil/bud center.
- Crochet Hook: 2.0mm hook.
- Scissors: For precise yarn cutting.
- Gauge: Gauge is not critical for this project; however, using 4-ply yarn and a 2.0mm hook will yield a flower measuring approximately 2.5 inches in diameter, and the stem's length can be customized as needed.
Skill Level
Beginner.
Special Techniques
- Magic Circle Technique:
Used for starting rounds to create a seamless center for flowers and buds. - Slip Stitch (ss):
Used to connect rows and petals seamlessly while maintaining a neat and compact design. - Simple Cluster Stitch:
This technique combines loops over the hook for an elegant daisy petal structure. - No additional support (wire/glue stuffing): The yarn itself provides all the structural integrity.
Finished Size
- Flower Head: Approximately 2.5 inches in diameter.
- Stem Length: Adjustable; typically 6-10 inches or longer depending on preference.
What You'll Learn from This Pattern
- How to master the magic circle technique for creating a seamless base.
- Shaping petals with chain loops and filling them with double crochet and half-double crochet stitches for a polished look.
- Wrapping yarn to create fluffy stamens for added texture.
- Techniques for joining and finishing with clean edges for durable, neat projects.
Step-by-Step Pattern Instructions
Flower Center (Baby Blue, Baby pink or White yarn)
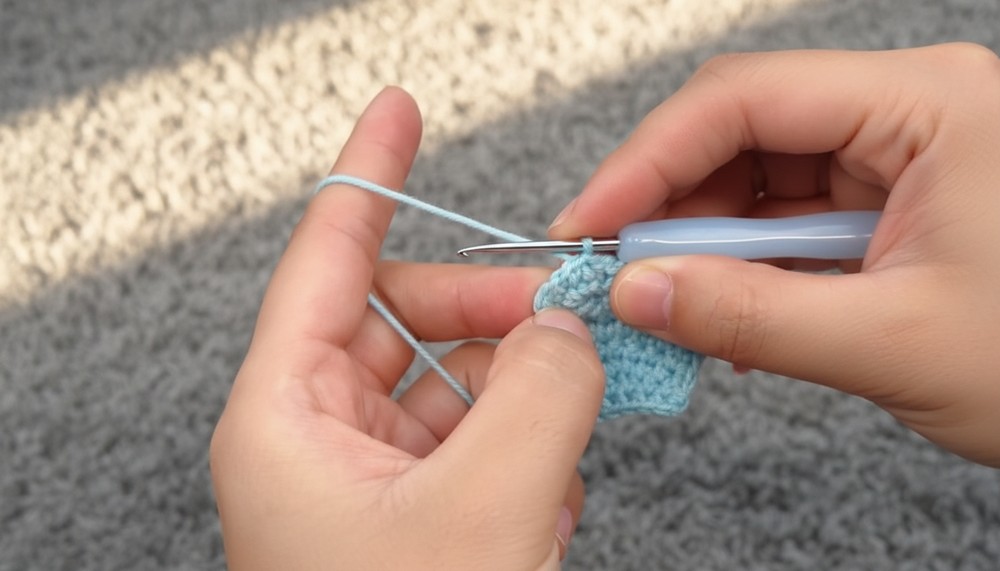
- Round 1 (Foundation):
- Make a magic circle and work 6 single crochets (sc) into the ring.
- Pull the loop tightly to close the circle.
- Insert the hook into the first sc, yarn over, pull through, and then pull through the loop on the hook.
(6 stitches total)
- Round 2:
- Chain 1 and begin working single crochet increases (2 sc in each stitch) into the first stitch and every stitch around. (12 total stitches)
- Slip stitch (ss) to join the round.
- Round 3:
- Chain 1. Work 1 single crochet (sc) in each stitch around (no increases). (12 stitches)
- Slip stitch to join. Cut yarn and fasten off.

Daisy Petals ( Baby Blue)
- Attach the Petal Yarn:
- With white yarn, insert your hook into a stitch from the flower center and pull through the yarn.
- First Petal:
- Chain 6, and flip to the back side of the chain (working into the back bumps).
- Insert your hook into the first back bump and pull up a loop. Repeat this process across all bumps:
- Pull through 1 loop (6 loops total).
- Yarn over and pull through 2 loops on the hook 6 times (this creates the petal's foundation).

- Shape the Petal:
- Chain 2, then work:
- 3 double crochets (dc) into the base of the petal.
- 1 half double crochet (hdc) into the next stitch.
- 1 single crochet (sc) into the last back bump.
- Slip stitch into the next stitch from the flower center to secure the petal.
- Chain 2, then work:
- Repeat the Pattern: Follow the same steps above to create 9 petals, attaching each one with a slip stitch in the next available stitch of the flower center.
- Finishing: After creating and attaching the final petal, slip stitch into the base of the first petal, fasten off, and weave in the ends on the back side to finish the flower top.
Flower Pistil ( Baby Blue, Baby pink or White yarn)
- Make the Pistil:
- Wrap the yarn 20 times around your index finger (for a full pistil). Carefully slide the yarn off your finger.
- Insert a piece of floral yarn through the middle of the loop and twist it tightly to secure.
- Customize the Pistil Strands:
- Trim the loops to create clean strands for the pistil. Use a comb to brush the strands to loosen them for a softer effect.
- Trim to your desired length.
Flower Bud (Optional)
- Bud Center (Yellow Yarn):
- Create a magic circle and crochet 5 sc into the ring.
- Slip stitch to join the round.
- Round 2:
- Chain 3 and crochet 2 double crochets (dc) into each stitch from Round 1. (10 stitches total)
- Slip stitch into the first dc to join the round.
- Tidy Bud:
- Fasten off and hide excess yarn inside the bud for neatness.
Stem and Leaves (Green Yarn)
- Stem Foundation: Chain 14.
- Crochet First Side:
- Work 12 sc along the chain starting from the second chain from the hook.
- In the last stitch, crochet 3 sc to form a rounded tip.
- Crochet Opposite Side:
- Rotate to the opposite side of the foundation chain and work 12 sc symmetrically.
- Create Leaves (Optional):
- Work a picot edge around the stem using [sc decrease + ch 2 + ss] repeated around the starting foundation chain.
- Fasten Off: Wrap the excess green yarn tightly around the stem's base to secure the ends.

Assembly
- Attaching Flowers and Buds:
- Arrange flowers and buds along the stem in your preferred order.
- Wrap each flower's base tightly with green yarn to attach them securely to the stem.
- Add Leaves: Add leaves along the stem for added realism and texture.

Customization Ideas
- Number of Petals: Test variations like 8 or 10 petals for unique appearances.
- Color: Experiment with pastel colors for a modern spring bouquet feel.
- Stem Length: Adjust the stem length as needed for your vase, bouquet, or project.
Conclusion
You've successfully crocheted a stunning daisy! This daisy flower design is quick, easy, and flexible, making it perfect for beginners or advanced crocheters seeking a fast project. Whether making a bouquet or single stem decor, each daisy offers versatility and beauty with minimal materials or effort.
Tips for Success
- Maintain consistent tension across petals for uniform size.
- Ensure petals are secure by slip stitching to the flower center.
- Use high-quality yarn for vibrant, lasting colors.