
Update your look instantly with the Free Crochet Capybara Purse Pattern for adorable accessories that make different and decent.
Nothing brings a smile quite like a playful and functional accessory inspired by one of nature's most charming creatures. This themed purse merges fun design with practicality, offering a delightful way to carry small items while showcasing your personality. Ideal for kids and adults alike, it serves as a compact bag for essentials such as keys, lip balm, cash, or small gadgets. Its lightweight pattern and adorable look make it a conversation starter wherever you go.
Beginner Friendly Crochet Capybara Purse Pattern for Trendy Look

Beyond its aesthetic appeal, this pattern is an eco-friendly alternative to mass-produced bags, reflecting a touch of handwork and individuality through its unique design. Use it to accessorize a casual outfit or gift it to an animal lover who appreciates quirky and practical items. With its size and secure closure, it's the perfect choice for amusement park visits, walks in the park, or quick trips where carrying a larger bag feels inconvenient.
Add Joy and Practicality to Everyday Life
The detailed pattern reflects the charm of the capybara, beloved for its friendly and relaxed nature, ensuring that this piece will captivate anyone who sees it. For families, it's a fun way to teach kids something new about animals while introducing them to stylish and functional accessories. Whether used as a standalone piece or part of a larger collection, this purse pattern offers both style and utility. It's more than just an accessory; it's something that adds joy to daily life in the simplest and sweetest way possible.
Finished Size
- Width: Approximately 10 cm (4 inches).
- Height: Approximately 6 cm (2.5 inches).
- Dimensions may vary slightly depending on your tension, hook size, and yarn type.
Materials
Yarn:
- Cotton Yarn:
- Use double strands.
- Suggested Yarn: Lem m Cotton, 125g.
- Colors Used in Example: Color Soft Pastel Pink and Black (secondary color).
Hook:
- 3.5 mm crochet hook (US Size E/4).
Accessories:
- Scissors: To cut yarn.
- Tapestry Needle: For sewing and weaving ends.
- Stitch Markers: Highly recommended for marking key areas.
- Pins: For aligning pieces during assembly.
Gauge
Gauge is flexible for this project:
- Typically, 10 single crochet stitches x 10 rows = 5 cm x 5 cm (2" x 2") using the specified materials.
Adjust your hook size slightly if necessary to achieve firm stitches for a sturdy wallet.
Unique Crochet Capybara Purse Pattern that's Fun for Daily Use
Welcome! This pattern will guide you step-by-step to crochet a cute, practical wallet with a beautiful shape and a finished look. Perfect as a quick handmade project, this wallet can hold small essentials like cards or money and makes a thoughtful gift.
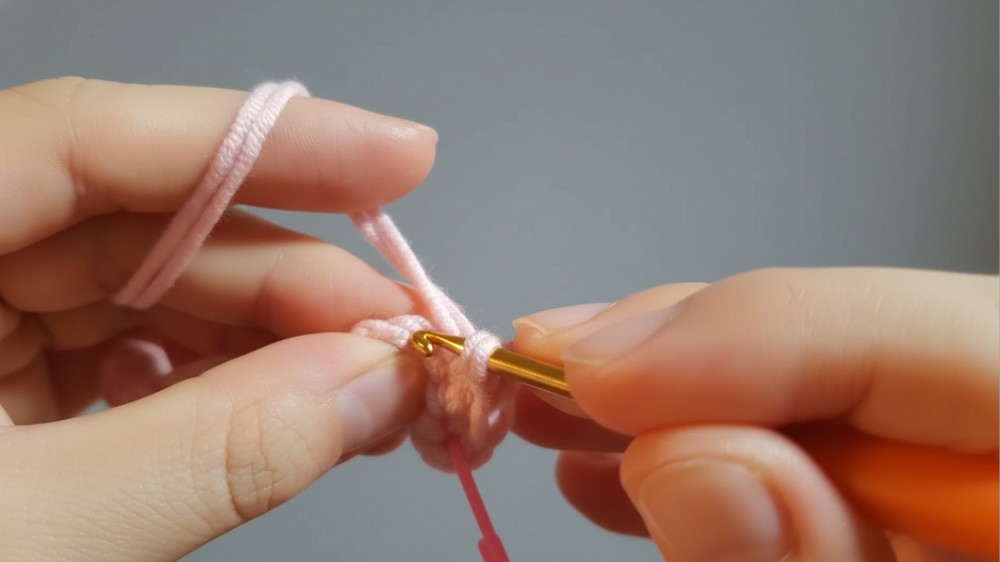
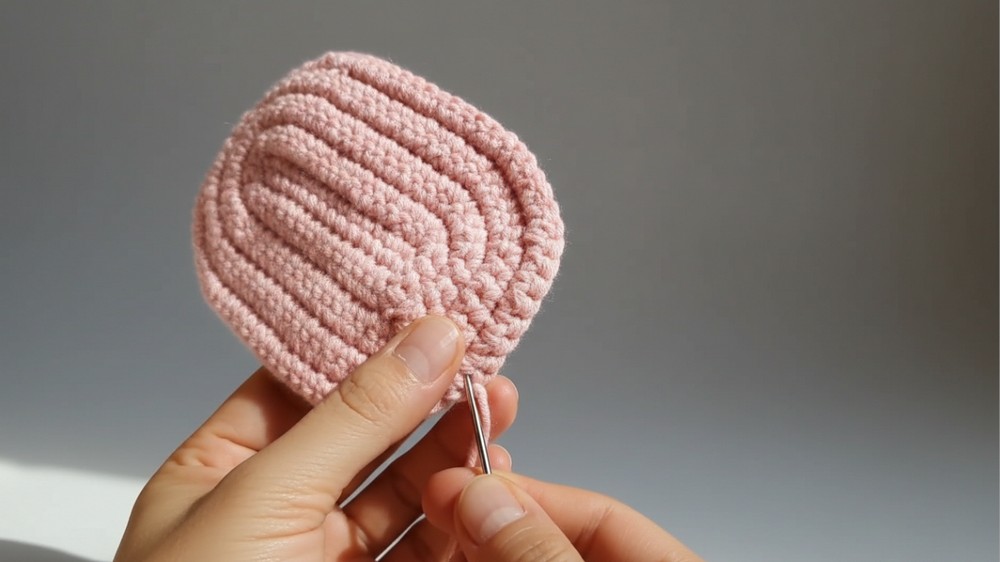
Step 1: Creating the Base
- Foundation Chain:
- Start with 15 chain stitches.
- Row 1:
- Begin crocheting in the second chain stitch (counting from the hook).
- Turn to the back of the chain to find the bumps in the middle of the chain stitch.
- Work the following:
- 2 single crochet stitches in the first chain stitch.
- 12 single crochet stitches across the next 12 stitches.
- In the final chain stitch: 3 single crochet stitches to round the corner.
- Row 2 (Start Working in Rounds):
- Rotate your work to crochet on the opposite side of the starting chain.
- Work 12 single crochet stitches symmetrically along the other side.
- Use a single crochet stitch in the last stitch to complete the round.
- Mark the Increase Points for Rounding:
- Stitch markers can be used around the points where corner increases occur (start and middle).
- Stitch markers can be used around the points where corner increases occur (start and middle).
- Repeat Rounds:
- Continue crocheting in rounds to build a smooth oval base:
- Add increases at the corner stitches using 3 single crochet stitches in the same stitch whenever needed.
- Continue crocheting in rounds to build a smooth oval base:
- Row 3-Building the Base Structure:
- Crochet using single crochet stitches to achieve clean edges while maintaining the shape:
- Increases will continue at rounded edges for symmetry.
- Crochet using single crochet stitches to achieve clean edges while maintaining the shape:
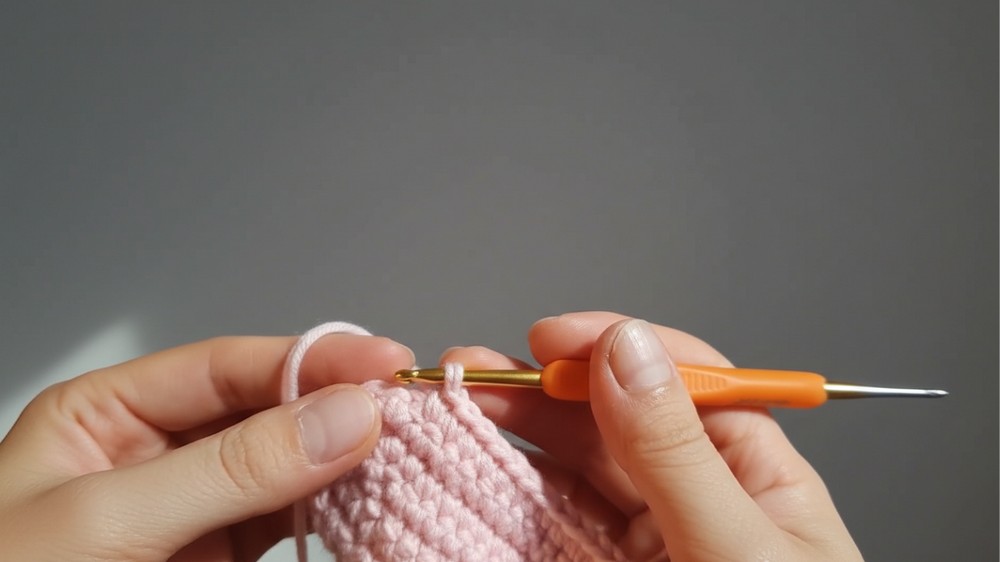
Step 2: Building the Wallet Body
- Begin Working the Walls:
- Transition from the base to the body by working continuous circular rows of single crochet stitches.
- Crochet the next row in Back Loop Only (BLO) to create a distinct edge between the base and body.
- Continue Rounds:
- Crochet one single crochet stitch in each stitch around the body.
- Ensure proper tension for uniform stitches.
- Height of Wallet:
- Work 8 total rows in continuous rounds to achieve the body height.
- Top Edge Finish:
- For the final row, work one single crochet stitch in each stitch, finishing the top edge.
- For the final row, work one single crochet stitch in each stitch, finishing the top edge.
Step 3: Crocheting the Side Panels
- Foundation Chain for the Side Panel:
- Create a chain of 10 stitches.
- Row 1:
- Begin crocheting in the second chain from the hook:
- Work single crochet stitches into the back loops of the chain to form the first row.
- Begin crocheting in the second chain from the hook:
- Rows 2-8:
- Turn your work each time and continue single crochet stitches across for a sturdy rectangular panel.
- Mark increase stitches on the last two rows:
- Increase stitches: Crochet 2 single crochet stitches in the same stitch at ends where rounding is needed.
- Create the Second Panel:
- Repeat the same steps to create the opposite side of the wallet.

- Repeat the same steps to create the opposite side of the wallet.
Step 4: Assembling the Wallet
- Align Side Panels to the Body:
- Use pins or stitch markers to align the side panels with the curved body of the wallet.
- Sewing the Panels:
- Using a tapestry needle and the same yarn, sew the side panels securely to the main body:
- Use a slip stitch technique or a ladder stitch for neat, invisible seams.
- Using a tapestry needle and the same yarn, sew the side panels securely to the main body:
- Reverse the Wallet:
- Turn your wallet inside out to hide the sewn edges and achieve a clean exterior.
Step 5: Adding a Closure to the Wallet
- Optional Zipper:
- Attach a 10-12 cm zipper along the top edge:
- Use pins to secure the zipper before sewing it in place with a tapestry needle.
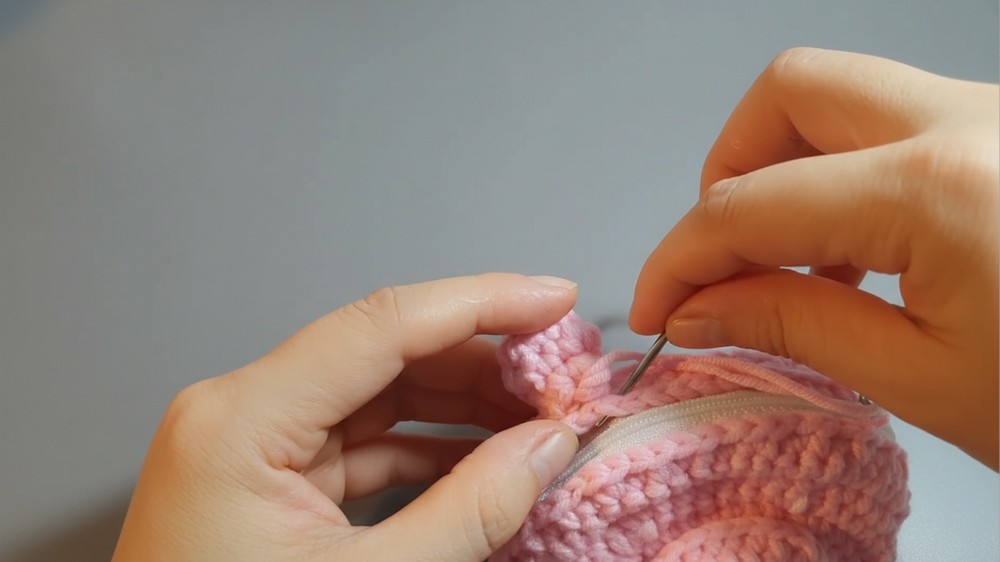
- Use pins to secure the zipper before sewing it in place with a tapestry needle.
- Attach a 10-12 cm zipper along the top edge:
- Button Closure:
- Alternatively, sew a decorative button to one side of the wallet and create a small button loop.
Step 6: Decorative Embellishments
- Simple Decorations:
- Add a felt or crocheted flower to personalize the wallet.
- Edge Embroidery:
- Use contrasting embroidery thread to stitch borders around the wallet seams.

- Use contrasting embroidery thread to stitch borders around the wallet seams.
Special Techniques
- Back Loop Only (BLO):
- For defining transitions between the base and walls, work stitches only into the back loop of each stitch.
- Increase Stitch Clusters:
- Create smooth curves by adding multiple single crochet stitches into each corner stitch.
- Invisible Sewing:
- Use ladder stitching when sewing panels together for seamless joins.
Customization Ideas
- Size Variations:
- Adjust the foundation chain to create larger or smaller wallets.
- Color Combinations:
- Experiment with single-color or multi-color designs to suit your style.
- Interior Pocket:
- Add a small crocheted pocket on the inside for extra storage.
Conclusion
This Crochet Capybara Purse project is perfect for beginner and intermediate crafters. The simple yet detailed instructions allow room for customization while ensuring the final product is neat and functional. Whether you're crafting for yourself or creating handmade gifts, this wallet is a charming, practical addition to anyone's bag collection.
Optional Add-Ons
- PDF Version: Create a downloadable copy of these instructions for future use.
- Tassels or Fringe: Add to the zipper or sides for playful flair.
- Embroidery or Appliqué: Personalize the wallet with initials or small patterns.