
Bring the timeless beauty of roses into your space without the hassle of maintenance. A crochet rose flower pot pattern allows you to create delicate blooms that stay vibrant year-round. Perfect for adding a personal touch to your desk, shelves, or gifting to loved ones, this project combines creativity with practicality. Style it as a centerpiece for a dining table or pair it with neutral-toned pots for a modern look.
Elegant Crochet Rose Flower Pot Pattern for Handmade Charm
You can customize the roses with bold reds, soft pinks, or even whimsical multicolored designs to suit any decor theme. Beyond its decorative appeal, this handmade piece offers a rewarding way to explore creativity while repurposing yarn into something that radiates charm, warmth, and enduring beauty.
Materials Required
- Yarn: 4-ply cotton yarn (any solid or gradient color as per your preference).
- Hook: 2.5 mm crochet hook.
- Tapestry Needle: For weaving in ends.
- Scissors: For cutting yarn.
- Measuring Tape (Optional): To ensure proper sizing.
- Stitch Markers (Optional): To help keep track of rounds for beginners.
Gauge
- Gauge is approximate and depends on your yarn tension:
- Circular Base, R1 (8 sc): Diameter = 1-1.5 cm (slightly adjustable).
- Ensure consistent stitching as this project features repetitive rounds.
Finished Size
- Sizes will vary depending on the number of components used and personal adjustments.
- Each circular base following R1-R9 (base) will measure approximately 4-5 cm in diameter.
- The decorative pieces (edging and flower) may extend slightly beyond this, depending on your chosen method.

Pattern Overview
This crochet project consists of the following key components:
- Circular Base: Built using single crochet increases.
- Decorative Border: Worked in single crochet, double crochet, and half-double crochet stitches to form lacy patterns.
- Flower Embellishment: A small, flower-like design is added for decoration.
- Optional Chains and Bars: Sections of decorative stitches (chains and double crochets).
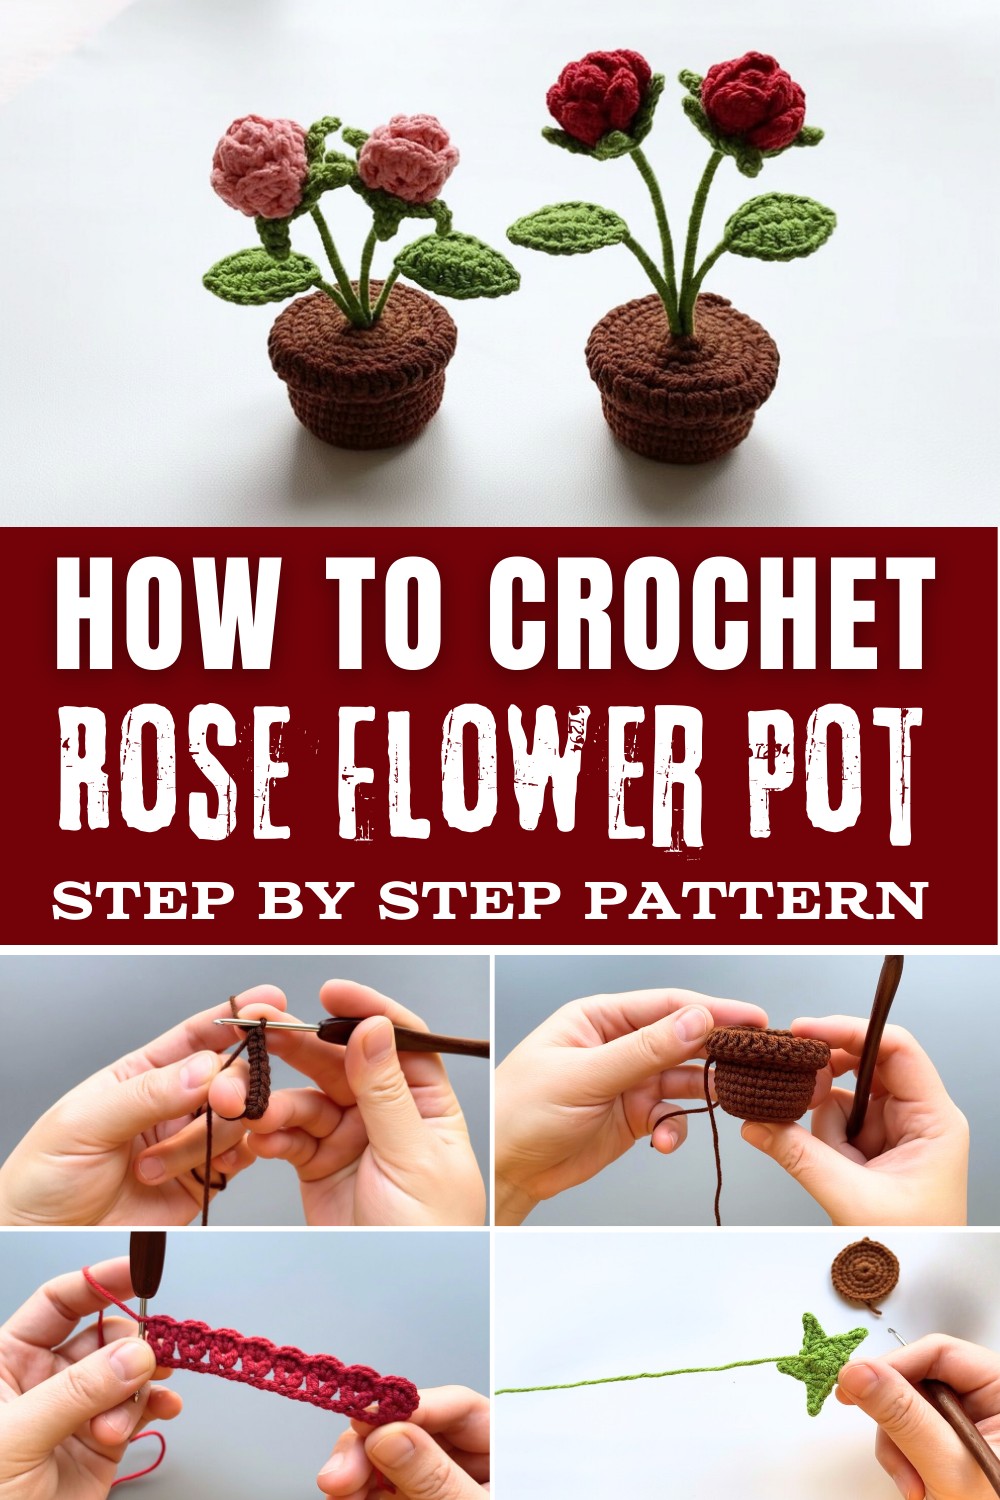
Crochet Rose Flower Pot Pattern
This pattern explains how to create a decorative crochet project using multiple components, including circular bases, detailed edges, and flower-like embellishments. It uses 4-ply cotton yarn and a 2.5 mm crochet hook, making it ideal for beginner-to-intermediate crocheters.
Circular Base (Main Piece)
- R1:
- Start with a magic loop.
- Inside the loop, crochet 8 single crochets (sc).
- Pull the yarn tail tightly to close the magic loop.
- Slip stitch (sl st) into the first sc to close the round.
- Chain 1 (ch 1).

- R2:
- Make 2 single crochets (sc) in each stitch around (inc × 8).
- You will have 16 stitches at the end of this round.
- Slip stitch in the first sc and chain 1.
- R3:
- (sc, inc) × 8 (i.e., make 1 single crochet in the first stitch, increase in the next by making 2 single crochets).
- At the end of this round, you will have 24 stitches.
- Slip stitch in the first sc and chain 1.
- R4:
- (sc, inc, sc) × 8 (i.e., 1 sc in the first stitch, 2 sc in the next to increase, 1 sc in the third stitch).
- This round will leave you with 32 stitches.
- Slip stitch in the first sc, chain 1.

- R5:
- Work 1 sc in back loops only across all 32 stitches.
- Slip stitch in the first sc, chain 1.
- R6-R9:
- Work 1 sc in each stitch around (32 sc).
- At the end of R9, chain 3.
Adding a Lacy Effect
- R10:
- Work 1 double crochet (dc) in each stitch around (total: 32 dc).
- Slip stitch in the first dc. Chain 3.
- R11:
- Work 1 dc in the front loops only in each stitch around (32 dc).
- Slip stitch in the first dc. Chain 1 and cut the yarn.
Decoration 1: Chain and Bar Section
- Start with Chain Foundation:
- Chain 24.
- In the 3rd chain from the hook, make 1 double crochet (dc).
- Chain 1, make 1 dc in the same stitch.
- Skip 2 chains, then in the next chain, (1 dc, chain 1, 1 dc).
- Repeat until the end of the chain foundation.
- Next Row:
- Chain 1, turn work.
- In the first space (where you created chain-1 from the row below), crochet 3 half-double crochets (hdc).
- Slip stitch in the next space.
- Repeat (3 hdc, slip stitch) across the row.
- Slip stitch, chain 1, and cut the yarn.

Decoration 2: Flower Embellishment
- R1:
- Start with a magic loop.
- Inside the magic loop, crochet 10 sc.

- Pull the magic loop to tighten the circle and slip stitch into the first sc.
- R2:
- Chain 5.
- Slip stitch into the next stitch.
- Slip stitch in the following stitch.
- In the next stitch, work (1 sc, 1 hdc).
- Skip 1 stitch, slip stitch in the next.

- Repeat (chain 5, sc, hdc, skip) until you form the flower petals.
Decoration 3: Small Leaf
- Chain 8, turn, and work into the chain:
- Work (1 sc, 1 hdc, 3 dc, 1 hdc, 1 sc) into one side of the chain.

- Work (1 sc, 1 hdc, 3 dc, 1 hdc, 1 sc) into one side of the chain.
- Turn and repeat the same sequence (1 sc, 1 hdc, 3 dc, 1 hdc, 1 sc) along the opposite side.
- Chain 1, cut the yarn, and weave in ends.
Special Techniques
- Magic Loop: Foundation technique to begin a tightly closed round.
- Back Loop Only: Used in R5 to create a subtle textured ridge.
- Front Loop Only: Worked on R11 for lacy effects.

Tips and Customization
- Color Combination: Try alternating colors for the base and decorative elements to make the project more dynamic.
- Adjust Sizing: Add more rounds to the circular base for a larger item, and adjust decorations accordingly.
- Multi-Purpose Use: Scale the design up or down to use these components as coasters, appliqués, or embellishments for larger projects.
Conclusion
This Crochet Rose Flower Pot combines simple techniques with decorative flair, making it ideal for beginners looking to enhance their skills. The use of increases, chains, and embellishments adds texture and elegance to the finished piece. Enjoy customizing it to suit your creative vision, and don't forget to block your work to achieve a polished and professional finish!