
Stitch a beautiful free crochet top down yoke with this easy pattern, featuring seamless construction, adjustable sizing, and an elegant design perfect for any season.
Starting from the top of a garment and working downward is a simple and practical way to create something seamless and well-fitted. The free crochet top-down method begins at the neckline and shapes a beautiful, wearable piece without the need for cutting or stitching separate parts. This approach saves time and makes it easy to adjust the length or size as needed, ensuring the final result fits perfectly.
Top Down Crochet Pattern: Perfect for All Levels

A top made using this method is lightweight, stylish, and suitable for any occasion. Its delicate texture adds a touch of elegance, and its breathable design makes it ideal for warm days. Whether pairing it with jeans for a casual outing or layering it over a dress for a more polished look, this type of top is a versatile addition to any wardrobe. Its effortless beauty makes it stand out in the best way.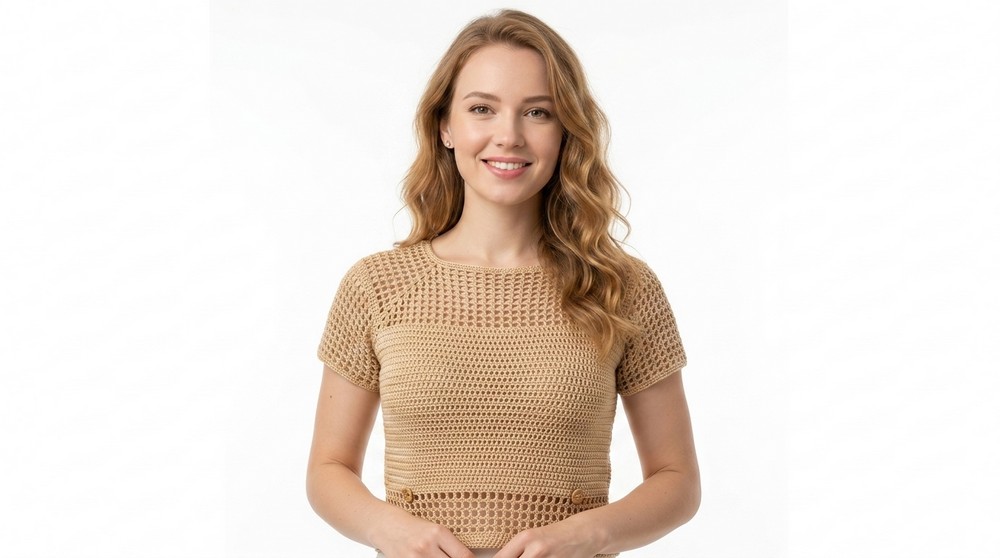
With little experience, it's possible to make something both functional and stunning. It's not only a practical choice but also a rewarding way to bring a fashionable piece to life that showcases both style and comfort.
Petunia Blouse Crochet Pattern
Materials Required
- Yarn: 2 skeins (approximately 150g each) of size Anne yarn or similar lightweight (#2/fine) cotton yarn. Choose any color you desire.
- Crochet Hook: Size 2.75 mm (US C-2).
- Optional Items:
- Stitch markers or 4 strands of contrasting thread (recommended for marking increases).
- Measuring tape.
- A small amount of glue (optional) for securing decorative additions.
- Scissors for cutting yarn.
Skill Level:
Intermediate to Advanced - Knowledge of working in the round, fan stitch, mesh stitch, and picot edging is needed. Beginners may follow with extra practice and patience.
Key Abbreviations (US Crochet Terminology):
- ch: Chain
- sl st: Slip Stitch
- sc: Single Crochet
- hdc: Half Double Crochet
- dc: Double Crochet
- fpdc: Front Post Double Crochet
- bpdc: Back Post Double Crochet
- picot: A decorative edging technique involving chain stitches and slip stitches into the same base chain.
- rep: Repeat
Special Notes
- Sizing Guidance:
- The sample project measures 44 cm across the bust and has an armhole depth of 22 cm, suitable for size S-M. Adjust the foundation chain and rows to fit your measurements.
- For larger or smaller sizes, add multiples of 12 chains to the foundation chain.
- Customizable Features:
- The blouse is designed as a top-down raglan. Optional flowers, decorative openings at the back, or neck embellishments can be added depending on your preferences.
- Sleeves can be short, medium, or full length, based on your style.
- Gauge (for reference):
- Approximately 16 stitches and 15 rows = 4" x 4" mesh pattern.
Pattern Instructions
Step 1: Foundation Chain
- Chain 156 stitches (or as required for your size), ensuring that the chain is a multiple of 12.
- Join the last chain to the first chain with a sl st to form a circle. Ensure the chain is not twisted.

Step 2: Set the Fan Stitch Placement
Divide the 156 chains into the following sections:
- 40 chains for the front.
- 40 chains for the back.
- 38 chains each for the sleeves (2 sleeves).
Marking the separation with stitch markers will help distinguish the sections. On the first round, work fan stitches at each section's beginning for increases.
Step 3: Begin the Yoke (Top Section)
Round 1:
- Place a fan stitch in each designated corner:
- A fan stitch consists of: 2 dc, ch 2, 2 dc in the same stitch.
- Between fan stitches, work mesh stitches:
- Ch 2, skip 2 stitches, dc in the next stitch.
- Note: Continue working mesh stitches (ch 2 + dc) across the front, back, and sleeves until reaching each corner, then insert a fan stitch.

At the end of the round, join with a sl st to the first chain. You should have 13 mesh squares between each fan stitch.
Rounds 2-10 (Increasing):
- Continue in the same pattern, working mesh stitches between every corner.
- At the corners (within each fan stitch), always insert another fan stitch (2 dc, ch 2, 2 dc) at every round.
- Repeat until the length from neckline to armhole measures approximately 22 cm or as per desired armhole depth.
Tip: After each round, use a stitch marker to track the start of new rounds and ensure symmetry across the yoke.
Step 4: Separate for the Sleeves
- Once the armhole depth is complete, separate the sleeves:
- Skip the sections marked for sleeves, joining the front and back sections by chaining across each skipped sleeve section.
- For example: ch 10-15 stitches when skipping over the sleeves for a more comfortable underarm.
- Begin working in continuous rounds for the body.
Step 5: Body Section
- Switch to Mesh Stitch:
- Continue ch 2, skip 2, dc for the desired length of the blouse.
- To avoid rolling or stretching, work closed dc rows every 10 rounds.
- Add texture with ribbed stitches:
- If desired, work fpdc or bpdc patterns on every 5th row for a decorative design.

- If desired, work fpdc or bpdc patterns on every 5th row for a decorative design.
Step 6: Sleeves
- Return to the skipped sections for the sleeves.
- Connect yarn, and begin working in rounds from the underarm.
- Repeat mesh stitch rounds as worked in the body.
- Length of Sleeves:
- Work 7 rounds for short sleeves or continue for desired sleeve length.
- Optional Picot Edging (for a more decorative look):
- Work sc in the first space, 3 ch, sl st in the same space, skip one space, and repeat.
Step 7: Edging and Final Touches
- Picot Edging for Neckline and Hemline:
- Work along the neckline, bottom hem, and sleeves using:
Sc, 3 ch, sl st in same stitch, skip 1.
- Work along the neckline, bottom hem, and sleeves using:
- Add a Decorative Flower (Optional):
- Use a contrasting color to crochet a flower and attach it to the blouse's neckline or back area.

- Use a contrasting color to crochet a flower and attach it to the blouse's neckline or back area.
Finishing
- Weave in all loose ends with a yarn needle.
- Lightly block the blouse to ensure the lace pattern is even. Use steam blocking for cotton yarn to give it a polished look.
- If needed, sew or glue any decorative flowers, appliques, or additional details.
Conclusion
The Petunia Blouse combines practicality and elegance, making it ideal for summer outings or casual wear. Its mesh-like texture ensures breathability and comfort, while its decorative options, such as picots and flowers, allow for a truly unique piece.
Pattern Corrections:
- If you find your mesh stitches are causing excess tightness or looseness, adjust the number of chains between stitches.
- Ensure precise measurements for the armhole depth for a perfect fit.
Tips for Success:
- Add Structure: While working mesh rows, use a stitch marker at the start of each round to track progress.
- Handle Cotton Yarn: Avoid pulling the yarn too tight, as cotton does not have much elasticity. Work with a relaxed tension for a better drape.
- Customize Design: Try adding gradient colors or color-blocking for a stylish variation.