
Keep your essentials organized in style with this Crochet Mini Card Holder Pattern, a customizable accessory perfect for cards & small items.
Carrying your essentials doesn't have to be boring when you can elevate practicality with creativity. A crochet mini card holder pattern is the perfect way to store your most-used cards in a lightweight, handmade accessory. Its slim, compact pattern fits neatly into any pocket or bag, making it ideal for busy days and quick errands. Whether it's credit cards, IDs, or even folded cash, this pattern keeps everything organized while offering a cozy touch that feels personal and stylish.
Practical Free Crochet Mini Card Holder Pattern for Everyday Accent

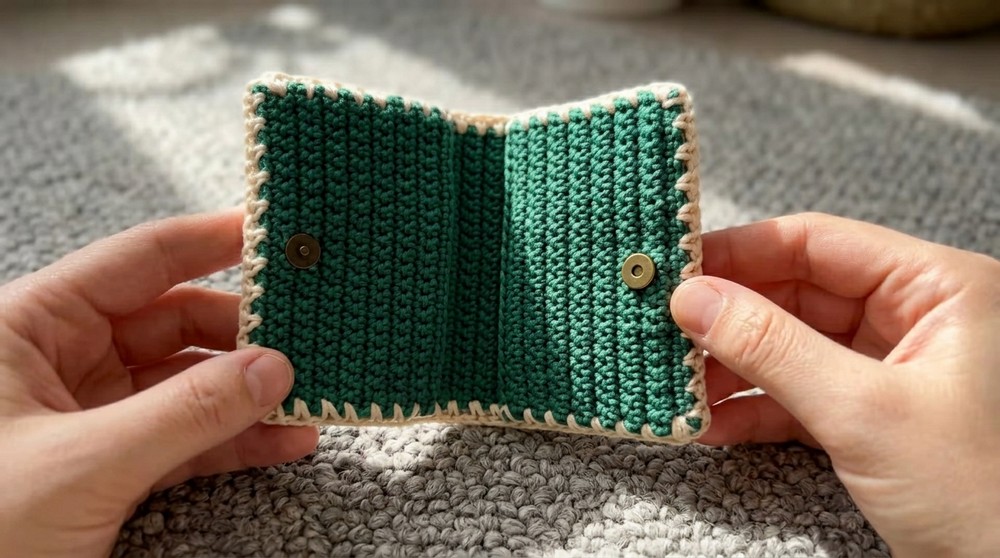
The beauty of this project lies in the small yet functional details. Designed to be sturdy yet flexible, it is crafted with single crochet stitches that create a durable texture for everyday use. You can follow the simple rows and repeats to build the base, and then add a decorative edge with a mix of single crochets, chains, and evenly spaced stitches. The result is not just practical but also visually appealing.
Beyond its everyday use, this card holder pattern is a thoughtful gift idea for birthdays, holidays, or even office swaps. It's an affordable way to show someone you care while offering something they'll find genuinely useful. Compact, customizable, and undeniably charming, this project proves that even your smallest accessories can add a little personality to your day, merging functionality with artistry effortlessly.

The free crochet mini card holder pattern is wonderfully versatile, and you can crochet a variety of items from it by making small adjustments or using it as inspiration. Here's a list of creative and functional items you can make from this pattern:
1. Coin Pouch
- Add a button or zipper closure to transform the cardholder into a small coin pouch.
- Great for keeping loose change organized in your bag or pocket.
2. Gift Card Holder
- Use the pattern to create a thoughtful handmade accessory for holding gift cards.
- A creative wrapper that can double as part of the gift itself.
3. Keychain Wallet
- Attach a keyring to one side, making it a mini-wallet that doubles as a keychain.
- Perfect for quick errands where you need only your essentials and keys.
4. Wallet Divider
- Use it as an organizer to separate cash, cards, or receipts in larger wallets without built-in slots.
5. Earbud or Cable Organizer
- Keep your earbuds, charging cables, or small tech accessories tangle-free in style.
6. Small Bag Attachment
- Add a strap or hook and use it as a decorative yet functional mini accessory for handbags or backpacks.

Materials
- Yarn: 1.5mm hollow cotton yarn in your choice of color(s).
- Hook Size: 2.5mm crochet hook.
- Notions:
- Scissors.
- Tapestry needle (for weaving in ends).
Gauge
- Gauge: 10 single crochet (sc) x 10 rows = 4 cm x 4 cm.
- While gauge is not critical for this project, keeping a consistent tension is important for a neat and professional look.
Finished Size
The finished Mini Card Holder will measure approximately 10 cm x 7.5 cm (4 inches x 3 inches). The size may vary slightly depending on yarn tension and hook size.
Special Techniques
- Slip Knot: Begin with a secure loop to anchor your project.
- Chains (ch): A foundational stitch, yarn over and pull the yarn through the loop on your hook.
- Single Crochet (sc): Insert hook into stitch, yarn over, pull through (two loops on hook), yarn over again and pull through both loops.
- Turning Rows: At the end of each row, chain 1 and turn your work to begin the next row.
- Repetitive Patterns: Alternating single crochet (sc) and chains (ch) for decorative borders.
Detailed Pattern Instructions
Main Pieces (Base of the Card Holder)
- Start: Create a slip knot.
- Foundation Chain: Chain 23 (ch 23) for the first row.

- Row 1 (R1):
- Work 1 single crochet (sc) in the second chain from the hook.
- Continue working 1 sc in each of the next 21 chains across for a total of 22 sc.
- Row 2 (R2):
- Chain 1 (ch 1) at the start of the row.
- Turn your work. Work 22 single crochet (22 sc) across.
- Repeat Rows:
- Repeat Row 2 (22 sc) for a total of 38 rows to form the main piece.
- Cut the yarn and weave in the ends neatly using a tapestry needle.

- Second Piece:
- Create a second piece using only 15 rows of 22 single crochet (22 sc) to form a smaller panel that will be attached as a pocket.
Assembly
- Positioning: Lay the smaller piece (15 rows) on top of the main piece (38 rows), ensuring the edges align neatly. This smaller piece serves as the pocket for the mini card holder.
- Joining the Edges:
- Reattach the yarn at the corner of the stacked pieces.
- Begin with 1 single crochet (sc) to join the two layers togethe.
- Chain 1 (ch 1) between each single crochet to add a decorative edge.

- In the corners, work 2 single crochet stitches (2 sc) into the same corner stitch for a smooth, rounded edge.
- Continue Decorative Edge:
- Along the open edges, use the pattern sc 1, ch 1, skip 1 to create an elegant yet simple border.
- Ensure the stitches remain uniform around the piece, fastening off at the end and weaving in the yarn tails securely.
Tips for Success
- Tension: Keep your tension consistent to create a polished and professional look. Avoid overly tight or loose stitches.
- Aligning Layers: Ensure the smaller pocket piece is perfectly centered before starting the joining process. Use clips or pins to hold layers in place if needed.
- Reinforce Corners: Use double stitches (2 sc) at corner joints to strengthen and maintain a smooth curve.
- Stretch Check: If using stretchy yarn, consider blocking the pieces after crocheting to prevent misalignment.
Customization Ideas
- Color: Use multiple yarn colors for the base, pocket, or decorative edges to add interest and style.
- Embroidery: Embroider initials, flowers, or patterns on the front face of the holder to personalize it.
- Fasteners: Add a small button and loop at the opening for additional security.
- Size Adjustment: To create a larger cardholder, increase the foundation chain and add more rows to the base and pocket pieces proportionally.
Conclusion
The Mini Card Holder combines functionality with a simple yet elegant design. Its sturdy hollow cotton structure makes it perfect for holding cards or other small items. This lightweight project is beginner-friendly but leaves plenty of room for creativity and customization.
Final Look and Remarks
Once completed, the Mini Card Holder should have a sleek, rectangular shape with a decorative edge and a functional pocket for securely holding cards. The finished piece is perfect as an everyday accessory or as a handmade gift for others. With this guide, you can create a versatile and stylish cardholder that showcases your skills and creativity.