
Who says hair accessories can't double as mini works of art? A Crochet Bow Hair Rope Pattern lets you create charming, customizable bows to elevate any hairstyle. This delightful project is perfect for turning leftover yarn into something stylish and functional, offering endless opportunities to play with colors, textures, and sizes.
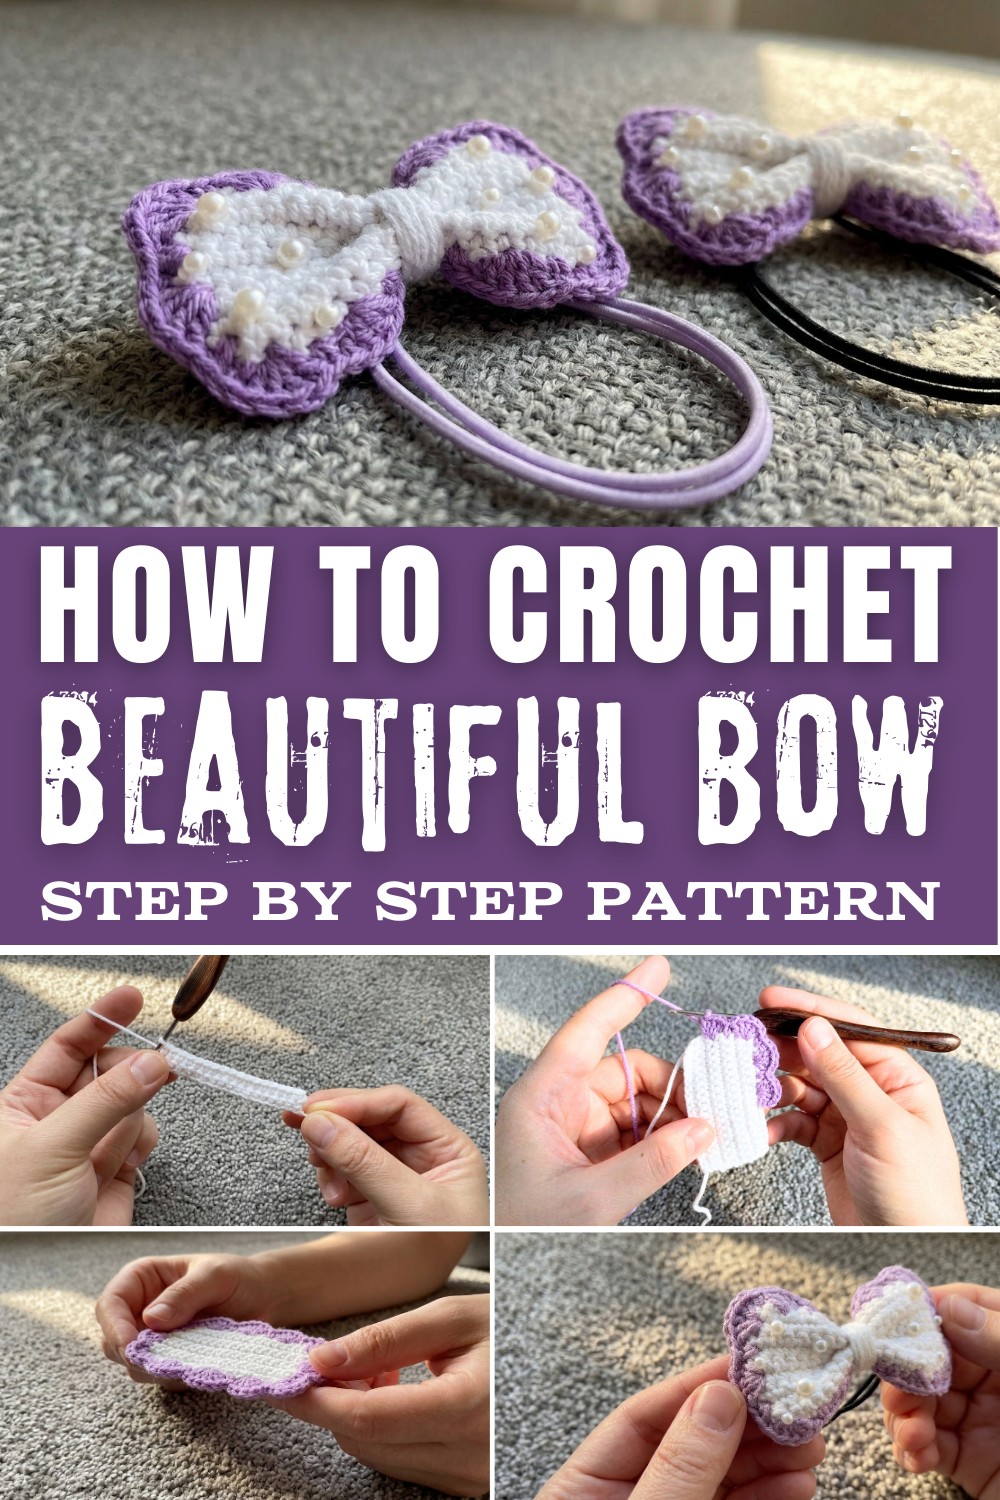
Whether it's a sleek monochrome design or a playful multicolor piece, the finished bow becomes a unique statement for ponytails, braids, or buns. It's a go-to project for quick gifting or sprucing up your own look. It's beginner-friendly yet satisfying for experts, making it a favorite for crocheters who love blending creativity with practicality. A bow can be small, but its impact is always big.
Materials Required:
- Yarn: Small amounts of lightweight (e.g., cotton or acrylic) yarn. You may use different colors for contrast between the bow and the edging.
- Crochet Hook: Use a 3.5 mm or 4.0 mm crochet hook or the recommended size for your yarn.
- Hair tie or Elastic Rope: Select one that suits your hair accessories.
- Tapestry Needle: For weaving in loose yarn ends and attaching the bow.
- Scissors: To cut yarn.
Abbreviations Used:
- ch: chain
- sc: single crochet
- dc: double crochet
- sl st: slip stitch
Gauge and Finished Size:
- Gauge: Not critical for this project since the bow can vary in size. Try to maintain consistent tension.
- Finished Size: The bow base typically measures 3-4 inches wide and the edging adds an ornate design, making it 4-5 inches wide depending on your yarn and hook size.

Crochet Bow Hair Rope Pattern
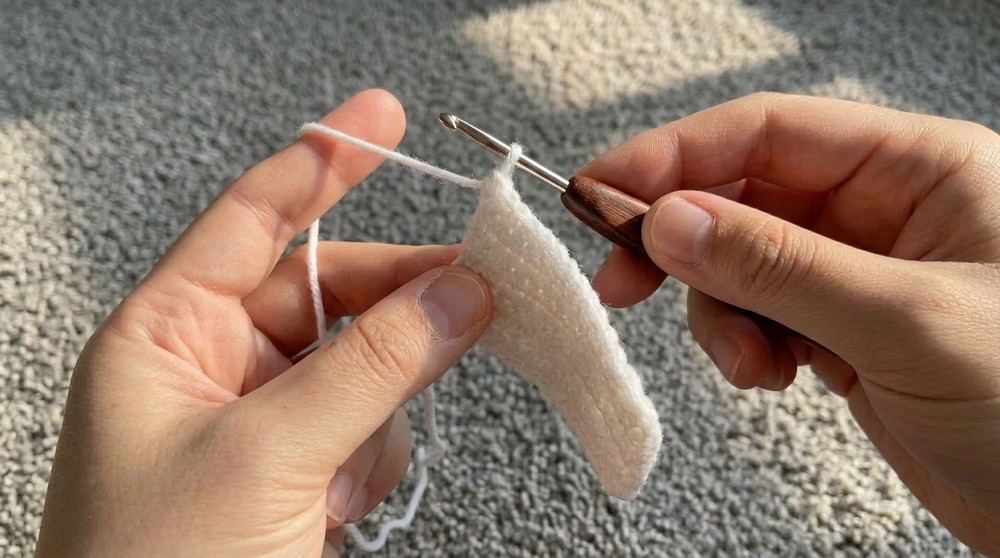
Step 1: Create the Bow Base
- Make a slipknot and place it on your crochet hook.
- Chain 18 (ch 18) to form the length of the bow base.
- Starting in the second chain from the hook, work one single crochet (sc) into each of the next 17 chains.

- You will have a total of 17 stitches in the row.
- Chain 1 (ch 1) and turn your work to start the next row.
- Work 1 single crochet (sc) into each stitch across.
- Finish Row 2 with 17 stitches, and ch 1 before turning again.
- Repeat this process (1 sc in each stitch, ch 1, and turn) for a total of 10 rows. This creates a rectangle.
- Once your 10 rows are complete, work ch 1, then cut the yarn, leaving a long tail (this will be used to secure the bow later). Set aside for now.
Step 2: Create the Edging (Bow Ruffles)
- Reattach yarn (you may use the same or a contrasting color) to one corner of the rectangle, and chain 2 (ch 2) to begin the ruffled edge.
- In the same stitch as the starting chain, work 5 double crochets (5 dc).
- This will begin your first "ruffle."
- Skip 1 stitch, then work 1 single crochet (sc) into the next stitch to secure the ruffle.
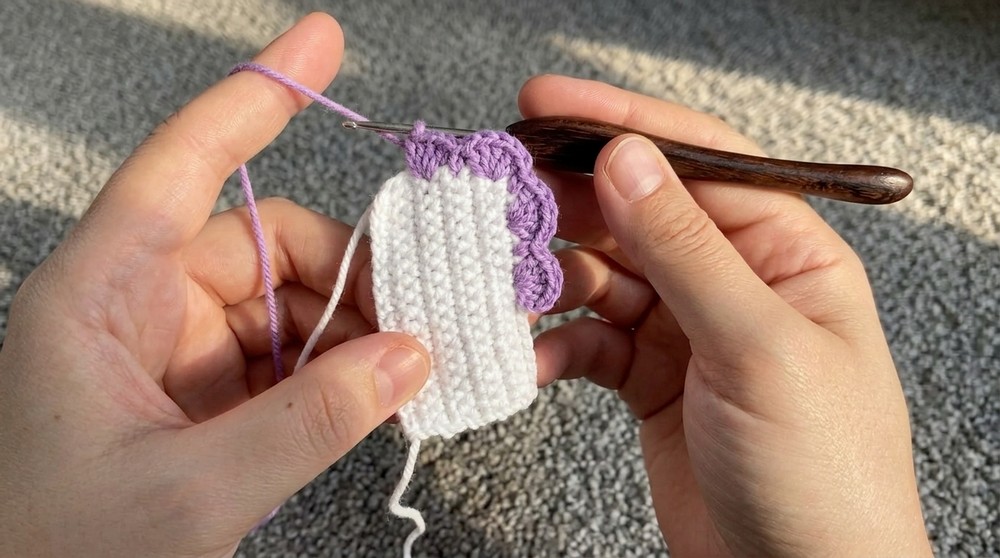
- Skip 1 stitch, and in the next stitch, work 5 double crochets (5 dc) to form the next ruffle.
- Repeat the process around all edges of the rectangle:
- Skip 1, 5 dc, skip 1, 1 sc, keeping the ruffled edging as even as possible.
- When you reach the starting point, slip stitch to the first chain or stitch to join.
- Cut the yarn and weave in loose ends with a tapestry needle.

Step 3: Forming the Bow
- Using the yarn tail left from Step 1, fold the rectangle in a bow shape by pinching the center.
- You can wrap the center several times with the same yarn tail to shape the bow securely.
- Tie a firm knot on the backside of the bow to hold your wraps in place.
- Sew or glue the bow onto your hair tie (elastic rope), ensuring it's firmly attached. If desired, you can use a fabric glue gun for additional security.
Tips for Success:
- Consistent Tension: Maintain even tension, especially when creating the rectangular base, to get a neat and symmetrical bow.
- Contrasting Colors: To make your bow more decorative, use a contrasting color for the ruffles. For example, a pink rectangle with white ruffles adds a playful design.
- Multipurpose Use: Instead of attaching the bow to a hair tie, you can sew it onto a scrunchie, soft headband, or even turn it into a brooch.
Customization Ideas
- Larger Bow: Increase the starting chain length (e.g., ch 24) and work more rows (e.g., 12-14 rows) to make a larger bow.
- Stripes: Alternate yarn colors every 2 rows in the base to create striped patterns.
- Beaded Edges: Add beads to your yarn while working the edging for a sparkly finish.

Conclusion
This Crochet Bow Hair Rope is an adorable and versatile project, perfect for beginners and experienced crocheters. It can be customized to suit any style, and the finished piece adds charm and personality to your hair accessories. With its 3D ruffled edges and soft texture, this bow is guaranteed to be both eye-catching and functional.