
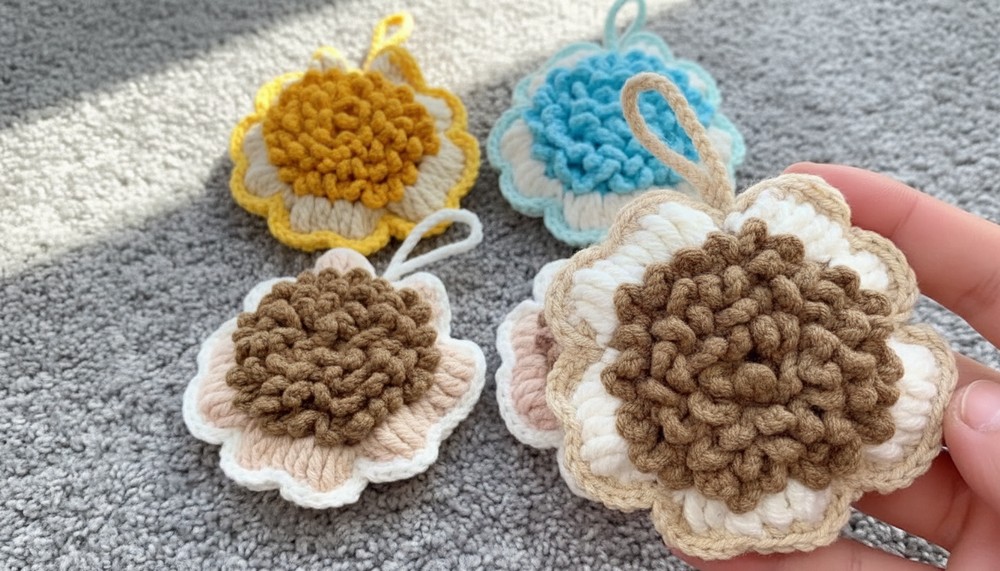
Carrying a little flower in your hands, but instead of just being pretty, it can also hold your small treasures. The Free Crochet Multi-Layered Flower Pouch Pattern turns this idea into reality. This pouch is crafted to look like a vibrant flower with soft, layered petals and tiny green leaves, making it as charming as it is useful.

Free Crochet Multi-Layered Flower Pouch Pattern for Decor
You can use it to keep coins, earrings, or any small items safe. Its colorful design and creative style make it a joy to create and carry. The petals stay in shape with the help of wires, giving it a neat and unique look. Whether you're new to crochet or just enjoy crafting, this flower pouch is a delightful project that combines beauty and functionality into one small masterpiece.
Materials Needed
- Yarn:
- 4-ply yarn (cotton or acrylic yarn recommended for sturdiness).
- Main color (for pouch body).
- Secondary color (for petals and accents).
- 4-ply yarn (cotton or acrylic yarn recommended for sturdiness).
- Crochet Hook: 2.5mm.
- Tapestry Needle: For weaving in ends and assembling parts.
- Scissors: To cut yarn cleanly.
- Optional: Stitch markers (helps when working in rounds).
Skill Level
- Intermediate to Advanced
Key Abbreviations (US Terminology):
- ch: Chain.
- ss: Slip Stitch.
- sc: Single Crochet.
- hdc: Half Double Crochet.
- dc: Double Crochet.
- inc: Increase (2 stitches worked in the same stitch).
- fo: Fasten Off.
Special Notes
- Working in the Back Loop: Certain rows in this pattern are worked in the back loop only (BLO) for a decorative effect and added texture.
- Petals: Petals are shaped using a combination of increases, making them broad and dimensional.
- Drawstring Feature: This pattern includes a built-in drawstring that allows the pouch to be securely closed.
- Assembly Tips: Make sure to align pieces and sew securely to ensure the pouch holds up during use.
Crochet multi-layered flower pouch Pattern
Step 1: Pouch Base
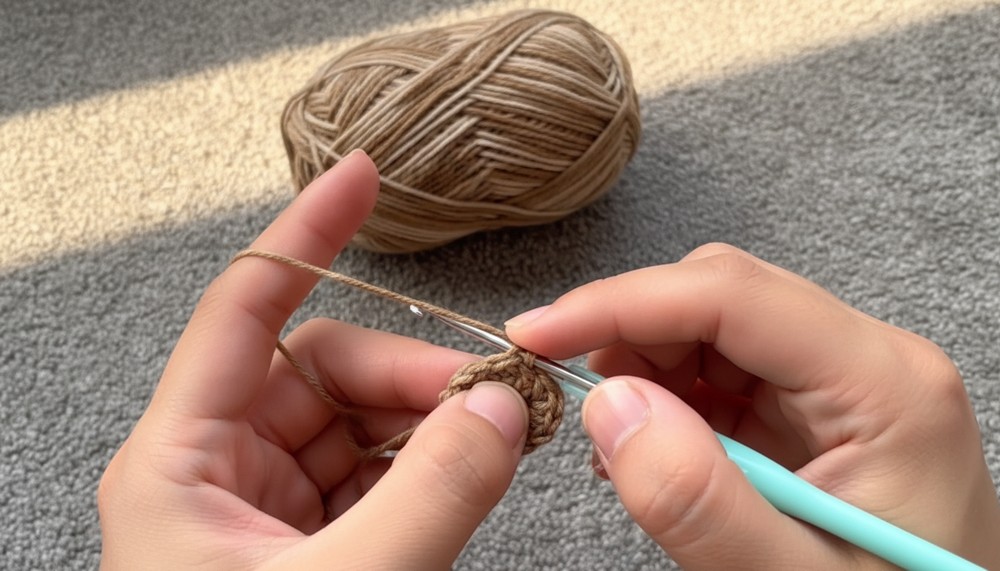
- Foundation: Magic Circle (MC):
- Create a magic circle.
- Into the circle, work 6 sc. (6 stitches total)
- Pull the loop tight to close the circle.
- Round 1:
- Insert hook into the first sc and slip stitch to join.
- Ch 1, then work 2 sc into each stitch (inc) around. (12 stitches total)
- Round 2:
- Insert the hook into the back loop only (BLO) and repeat:
- 1 sc in the first stitch, 1 sc inc in the next stitch.
- Repeat this pattern 6 times. (18 stitches total)
- Insert the hook into the back loop only (BLO) and repeat:
- Round 3:
- Continue working in BLO. Follow the pattern:
- 1 sc in the first 2 stitches, 1 sc inc in the next stitch.
- Repeat this pattern 6 times. (24 stitches total)
- Continue working in BLO. Follow the pattern:
- Rounding Out the Bottom:
- Add more rounds as needed to expand the base:
- Round 4: 1 sc in the first 3 stitches, 1 sc inc in the next stitch. (30 stitches total)
- Round 5: 1 sc in the first 4 stitches, 1 sc inc in the next stitch. (36 stitches total)
- Add more rounds as needed to expand the base:
- Fasten Off:
- After completing your desired base size, fasten off and weave in the yarn tail.
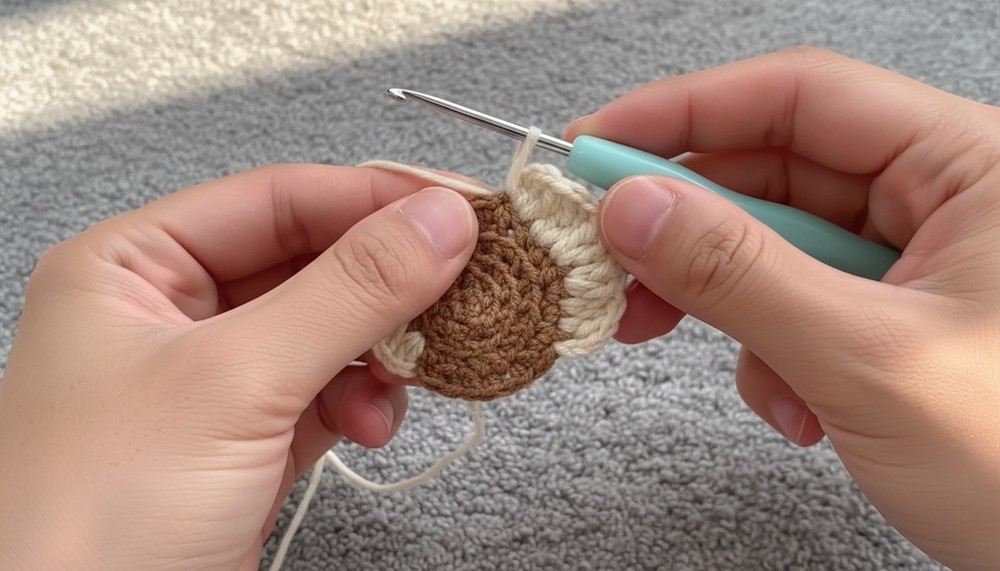
Step 2: Pouch Body
- Attach New Yarn Color:
- Reattach yarn to any stitch at the edge of the base.
- Forming the Pouch Walls:
- Ch 1, then work 1 sc into each stitch around. (36 stitches total)
- Continue Working Upwards:
- Repeat the previous round until the pouch measures approximately 3 inches tall or your desired height.
- Optional Decorative Row:
- For added texture, work 1 round of BLO sc to create a slight ridge near the top.
Step 3: Creating the Petals
- Foundation for Petals:
- Attach secondary yarn color to any stitch at the top edge of the pouch.
- Ch 3 (counts as dc), skip the next stitch, and ss into the next stitch.
- Shaping Each Petal:
- Work the following sequence into each stitch:
- 1 dc, 1 dc inc (2 dc in the same stitch), followed by 1 ss to secure the petal.
- Alternate with chain stitches between petals to enhance spacing.
- Work the following sequence into each stitch:
- Repeat Until Complete:
- Continue forming petals around the entire top edge of the pouch.
- Fasten Off:
- Once the petals are complete, fasten off and weave in the yarn tail.

- Once the petals are complete, fasten off and weave in the yarn tail.
Step 4: Adding the Drawstring
- Create Chain for Drawstring:
- Using the same yarn color as the petals, chain 35-40 stitches (or long enough to wrap around the pouch's opening).
- Thread the Drawstring:
- Weave the chain through the space just below the petals, alternating over and under every few stitches.
- Add Optional Ends/Flowers:
- For extra charm, you can create small flowers or pom-poms to attach to the ends of the drawstring.
Step 5: Assembly and Finishing
- Fold and Secure:
- Fold the pouch in half and sew the sides neatly using sc along the edges or a tapestry needle.
- Reinforce Petals:
- Ensure all petals lie flat and sew any loose stitches down for a polished look.

- Ensure all petals lie flat and sew any loose stitches down for a polished look.
- Final Adjustments:
- Pull the drawstring to close the pouch and ensure it opens and closes smoothly.
Tips for Customization
- Increase the Size: For a larger pouch, repeat additional rounds on the base and body sections, ensuring consistent increases.
- Mixed Colors: Use gradient or variegated yarn for a unique touch and a dynamic floral effect.
- Decoration: Add buttons, beads, or appliqués for extra personalization.
Conclusion
Congratulations! You have successfully crocheted multi-layered flower pouch. This versatile pattern allows you to adapt the size, colors, and decorations to suit your preferences. Whether used for holding small items, as a headphone case, or a thoughtful handmade gift, this pouch is sure to charm anyone who sees it.
Pattern Corrections
- Ensure even tension in the petals and drawstring for a cohesive look.
- If the petals curl excessively, block them by lightly steaming or pinning them down.
Final Tips
- Durable Seams: Sew the ends securely to ensure durability during use.
- Storage Tip: To maintain the shape, lightly stuff the pouch when not in use.